This article deals with how to define your APIs using RAML, publishing to CloudHub and Sharing the API with the developers so that they can play with it.
In this article, we work with 4 parts of API first Development and they are:
- Define the API using RAML
- Generate application using RAML
- Deploy the application in CloudHub
- Share deployed service through Developer Portal
- Accessing the Developer Portal
Define the API using RAML:
Anypoint Platform – Anypoint Platform is owned by MuleSoft and using Anypoint Platform you can develop full cycle of API applications. MuleSoft has its own runtime engine and has lot of connectors they call Anypoint Connectors which are useful for quickly connecting to databases, transports and other vendor specific applications within a few steps. MuleSoft has a very good reputation in the Enterprise Integration tools. You can learn more about MuleSoft from this website https://www.mulesoft.com/platform/enterprise-integration. MuleSoft is backed up by huge developer community and it has community edition of softwares available for making your hands dirty. RAML is an Open specification and the initiative has been taken by MuleSoft. MuleSoft has built their software using most of the software patterns taken from Enterprise Integration Patterns by Hohpe & Woolf, 2003 (http://www.eaipatterns.com).
With RAML, you can follow API-first development approach i.e. design and test your API first and then develop the service later.
Let’s start designing the RAML file first. RAML stands for RESTful API Modeling Language. Using RAML you can define your service’s APIs and can build an application using Anypoint Studio and can share the API with the developer world.
I am not going to explain how to build MuleSoft applications in this article, but will show you how to generate one using the RAML. If you would like to explore more about RAML, you can browse this URL http://raml.org. You can define RAML using Anypoint Platform by registering for free or adding a package “API Workbench” to “Atom” IDE. I have used Anypoint Platform to generate RAML and the version I have used is 0.8 because I can generate Swagger file from the RAML file to experiment the same using Azure API Management and I found that most of the online converter tools support only RAML 0.8.
My RAML deals with designing APIs for an Account service which has got the following operations:
- Get Accounts (HTTP GET)
- Create a new Account (HTTP POST)
- Get Account for Account ID (HTTP GET)
- Delete an Account for Account ID (HTTP DELETE)
- Update an Account for Account ID (HTTP PUT)
The main advantage of using RESTful service is to use the HTTP methods for operations and the beauty is it is light-weight and supports JSON and XML. REST is an architecture and creating APIs for our example is just adhering to the REST principles but not whole gamut of REST.
Now let us translate the operations to resource format and see how our APIs look like for the first hand before creating the actual.
| Operation | Resource Uri | HTTP Method |
| Get Accounts | /accounts | GET |
| Create a new Account | /accounts | POST |
| Get Account for Account ID | /accounts/{id} | GET |
| Delete an Account for Account ID | /accounts/{id} | DELETE |
| Update an Account for Account ID | /accounts/{id} | PUT |
Now we are ready with the operations that we want to create an API for. Let us start creating RAML file for the above operations. I am not going to explain about the API Workbench as this URL http://apiworkbench.com/docs/ provides a step by step details about generating RAML file.
I am going to show my RAML text for you to understand. First, we need to specify RAML version and then title of the service, version of the service and the base Uri details as below:
#%RAML 0.8
title: Bank Accounts
version: v1
baseUri: http://accountsservice.cloudhub.io/api
Then I would be defining my first operation “Get Accounts” as below:
/accounts:
    description: Collection of Accounts
    get:
        description: Get list of all Accounts
        responses:
            "200":
                description: Accounts found
                body:
                    application/json:
                        example: |
                            [{
                              "id":"12345678",
                              "accountType":"Single",
                              "bankId":"BANK01",
                              "customerId":"CUST001"
                            },
                            {
                              "id":"910111213",
                              "accountType":"Single",
                              "bankId":"BANK01",
                              "customerId":"CUST002"
                            }]
            "404":
                description: No Accounts found
                body:
                    application/json:
                        example: |
                            {
                              "message":"No Accounts found"
                            }
post:
        description: Add an Account
        body:
            application/json:
                example: |
                    {
                      "id":"910111214",
                      "accountType":"Single",
                      "bankId":"BANK01",
                      "customerId":"CUST003"
                    }
        responses:
            "201":
                description: Account is successfully created
                body:
                    application/json:
                        example: |
                            {
                              "id":"910111214",
                              "accountType":"Single",
                              "bankId":"BANK01",
                              "customerId":"CUST003"
                            }
As you can see I could capture everything needed for my operation “Get Accounts”. Like I have defined the resource Uri for the operation (/accounts) and specified the HTTP method that will be used to invoke the operation and sample responses for 200 and 404. I could mention the content type and description of each method. This is the beauty of defining RAML before actual coding. We can share the RAML file to the team members and they will get a clear picture on what to develop and it would be very easy for explaining to the team.
Similarly, my other operation design will be as below:
/{id}:
        description: Particular Account
        uriParameters:
            id:
                displayName: id
                type: string
                required: true
                repeat: false
        get:
            description: Retrieve an account by id
            responses:
                "200":
                    description: Account by the specified account id exists.
                    body:
                        application/json:
                            example: |
                                {
                                  "id":"12345678",
                                  "accountType":"Single",
                                  "bankId":"BANK01"
                                  "customerId":"CUST001"
                                }
                "404":
                    description: Account by the specified account id does not exists.
                    body:
                        application/json:
                            example: |
                                {
                                  "message":"Account specified by the account id does not exists"
                                }
        delete:
            description: Delete an account by id
            responses:
                "204":
                    description: Successfully deleted the account specified by the id
                    body:
                        application/json:
                            example: |
                                {
                                  "message":"Account specified by the id successfully deleted"
                                }
        put:
            description: Replace an account by id
            body:
                application/json:
                    example: |
                        {
                          "accountType":"Joint",
                          "bankId":"BANK01",
                          "customerId":"CUST001"
                        }
            responses:
                "204":
                    description: Successfully replaced the account details for the account id
                    body:
                        application/json:
                            example: |
                                {
                                  "message":"Account specified by the id successfully updated"
                                }
documentation:
    -
        title: RAML for Accounts API

        content: This is a sample RAML file for Bank Accounts API
When you go through the whole RAML file, you would understand the intention of the API and the operations supported. One more beautiful feature provided by Anypoint Platform is that you can start testing the operations without actual service deployed. Anypoint Platform dynamically generates mock service and you can test all your operations without consuming the actual service.
Just for reference I will show you how it looks like testing the RAML in the Anypoint Platform. I have logged into https://anypoint.mulesoft.com and went to “API Manager” and opened my RAML file and if your RAML file is correctly formatted then you should see on the right side of the page a section called “Resources” which has listed your resources with the supported operations. Also, you should see a “Mocking Service” slider on the top of it and you need to slide it to ON the mocking service and you should see “ON” in green color.
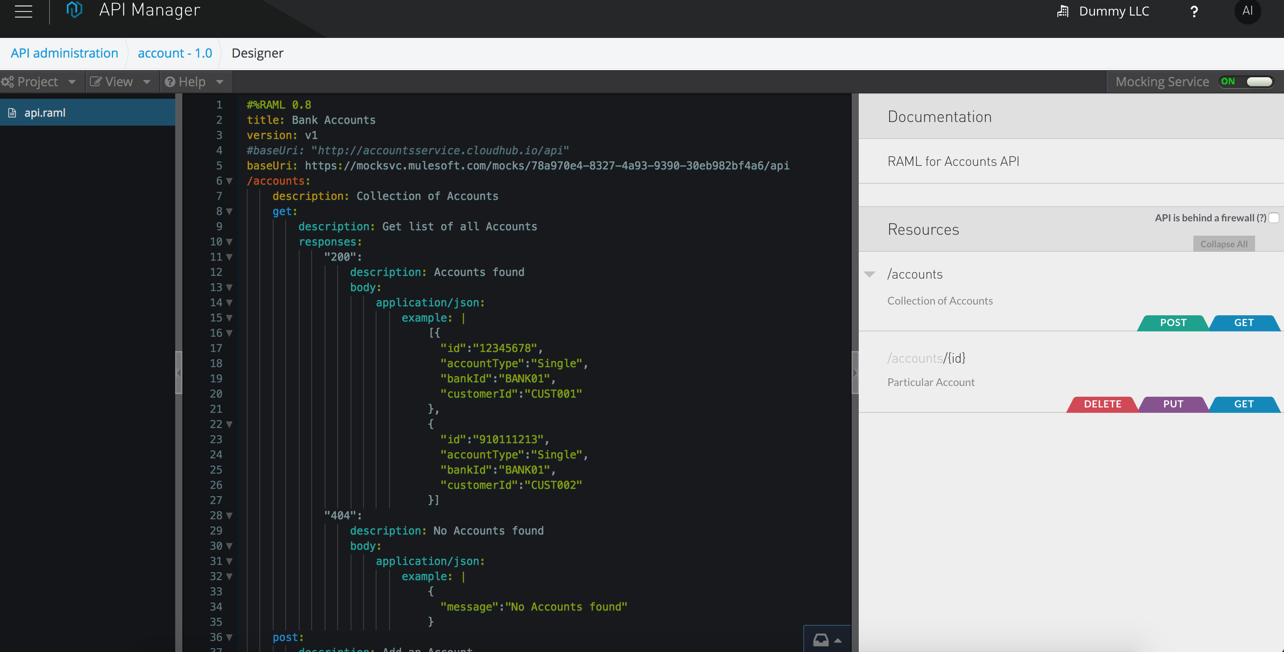
Figure 1 – RAML with the Mocking service
I will not be testing all the operations but one for showing how it works. When I click “Post” underneath the resource “/accounts” and I should see the description, security schemes and body with examples, if you have added an example for each operation. In our case, I have added and so you should see examples for each operation. when I click “Try it” button, you should see something like this on the right side of the screen:
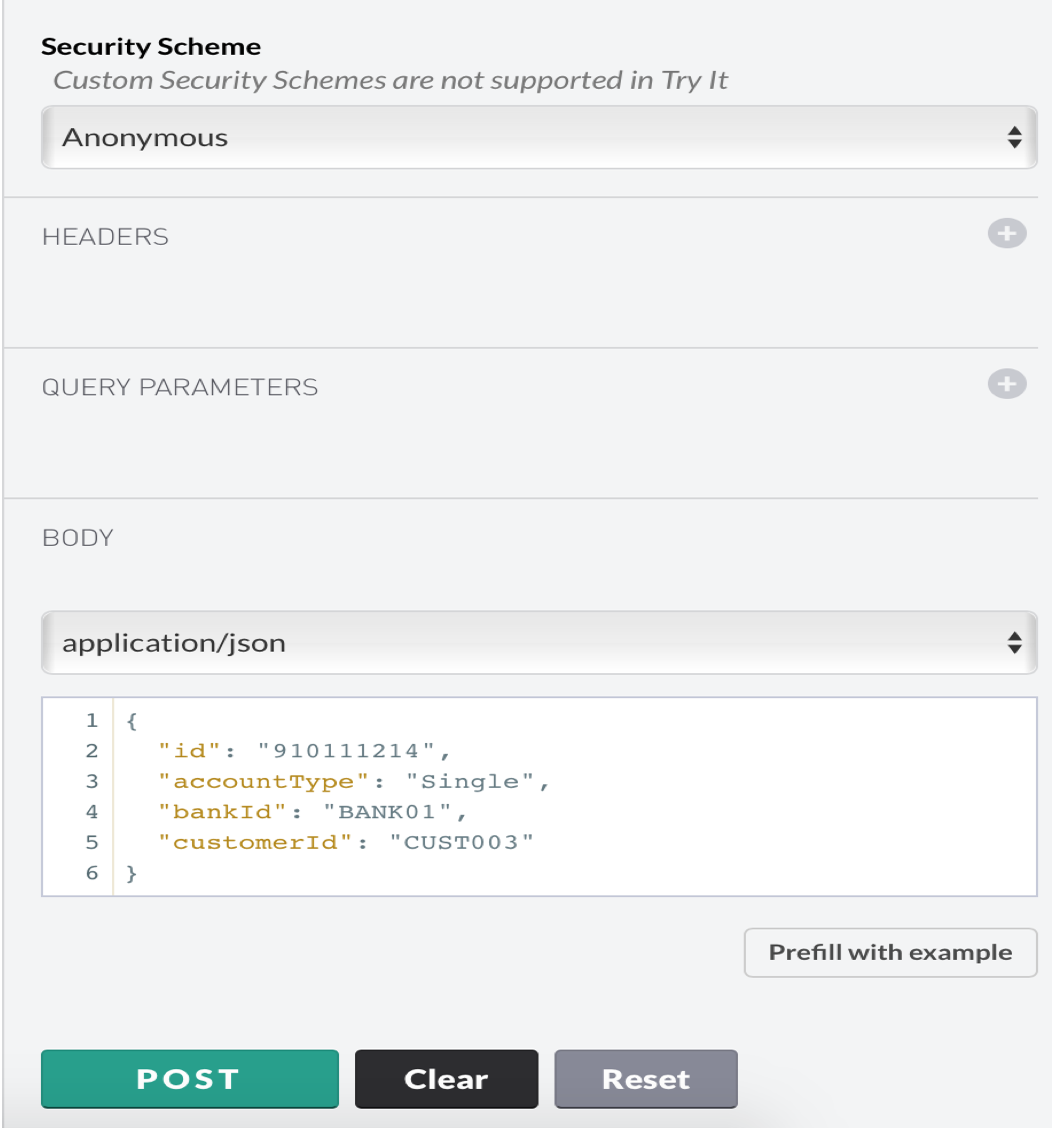
Figure 2 – Try it option
When I click the “Try it” button, by default API Manager comments the original base Uri and appends mock service Uri (https://mocksvc.mulesoft.com/….) as below:

Figure 3 – Mock service appended in the RAML
When I click the “POST” button, then it submits the request to the mock service using the example request added in the RAML and respond back with the example response added as below:
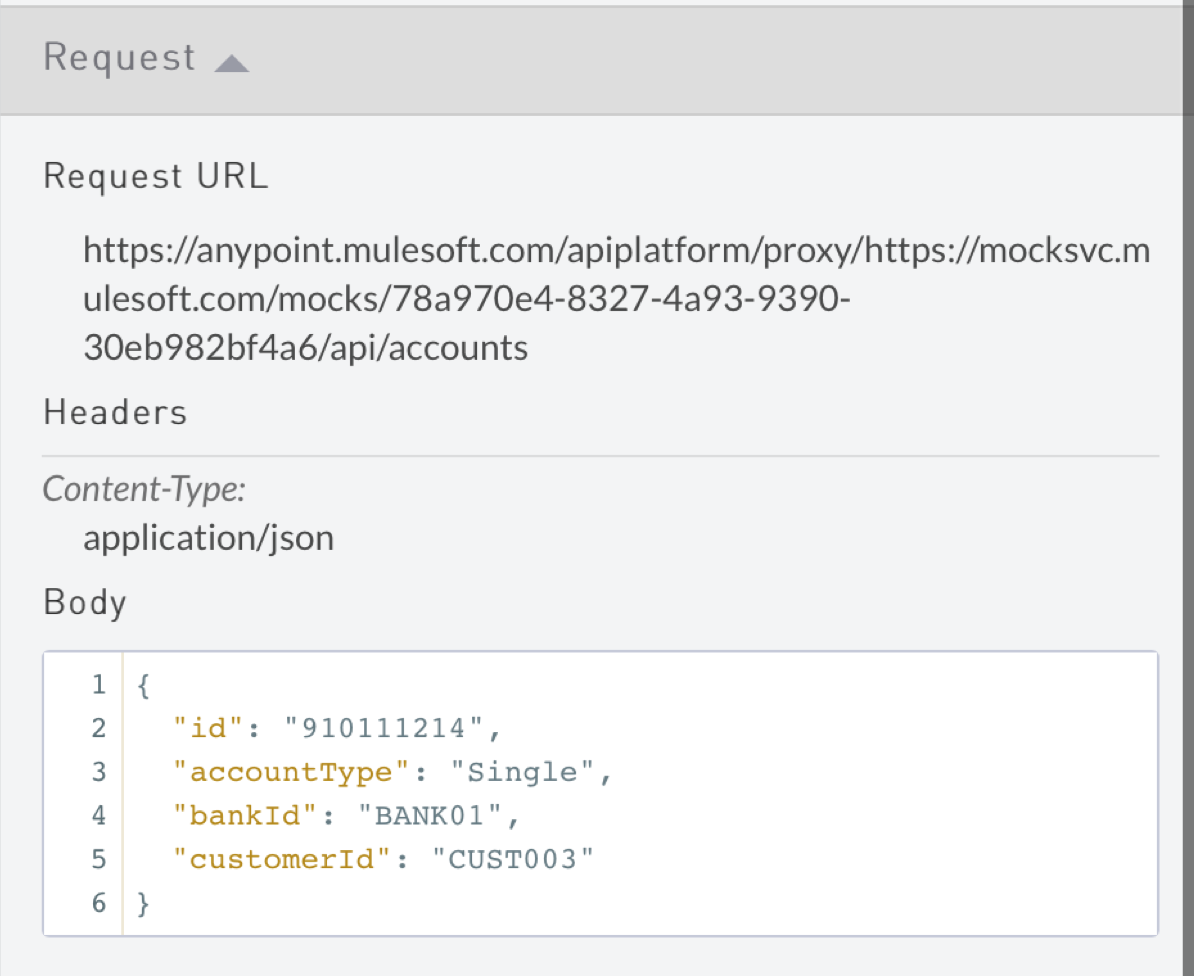
Figure 4 – Mock Service Request
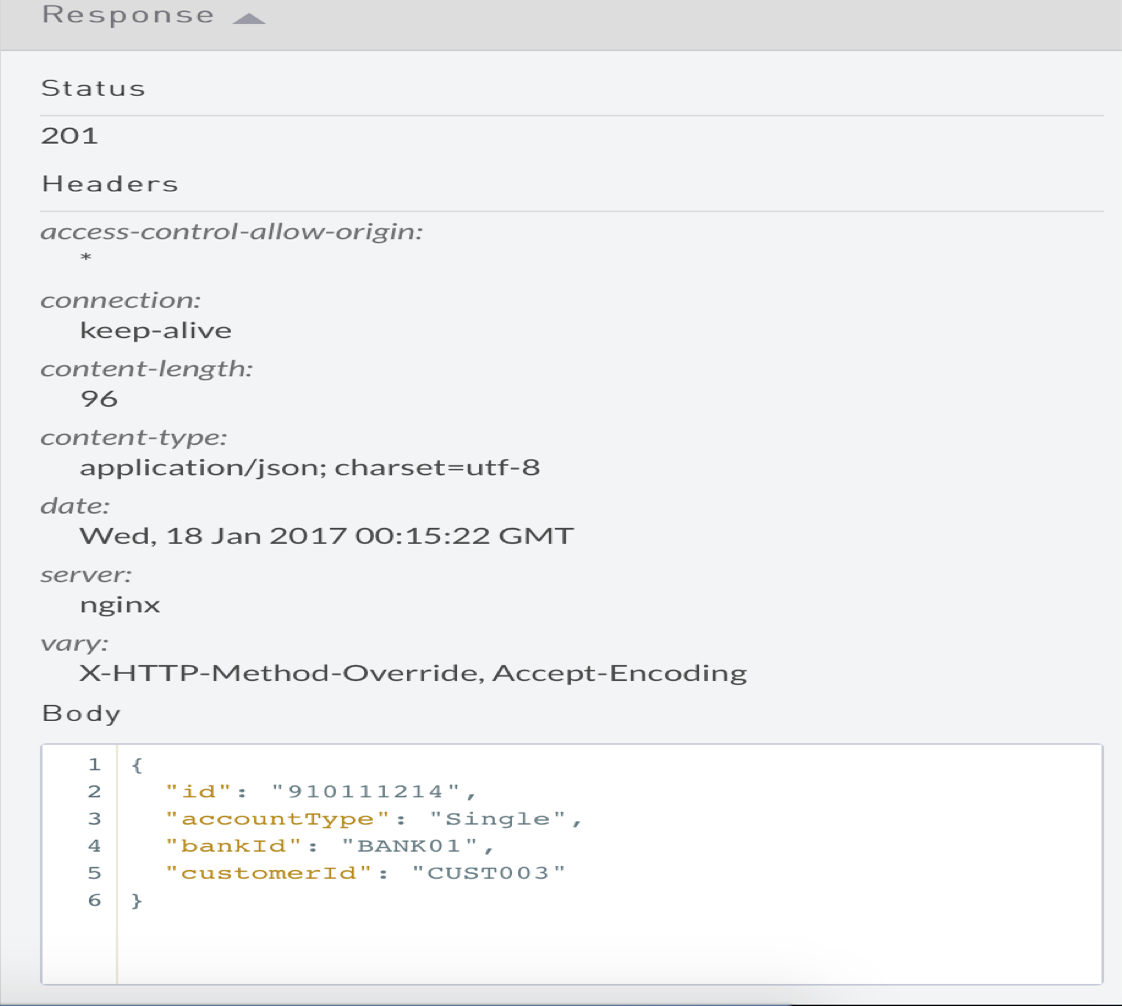
Figure 5 – Mock Service response
Similarly, you can test all your operations without building the actual service and do any necessary changes.
As mentioned earlier, this helps you to design and test your APIs before the actual development. I would be using MuleSoft’s Anypoint Studio to build the application.
I would encourage to play with creation of RAML using Anypoint Platform to understand what I have explained till now. RAML is my favorite format of capturing my API requirements and I personally find it easy to share with the developers my design.
Instructions if interested:
- Browse the URL https://anypoint.mulesoft.com and create an account.
- Once you create your account, login into the website. Now click on the “API Manager” pointed out in the below screenshot:
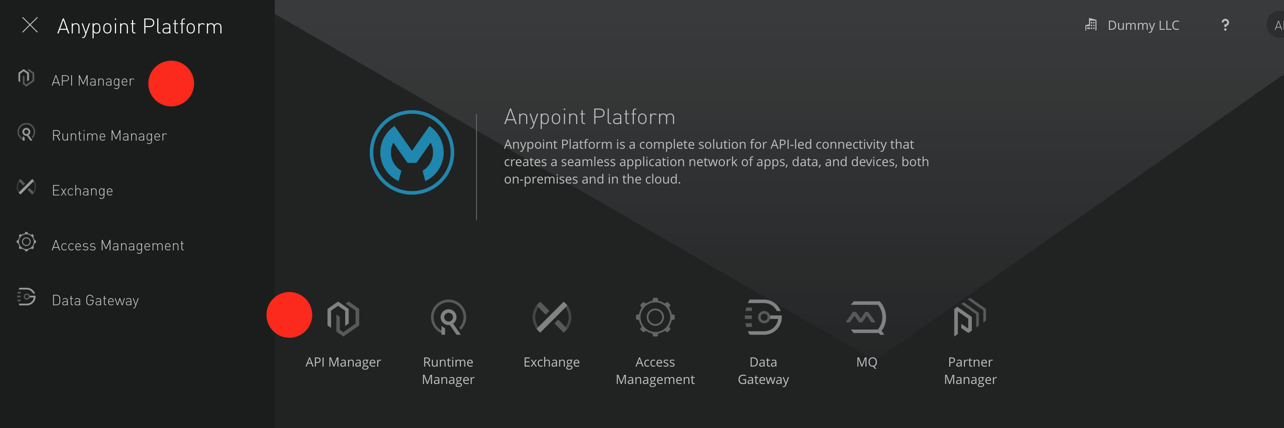
Figure 6 – API Manager
- You will be presented with a screen for “API Administration” and click “Add new API” button on the page to create a new API.
- Fill the details of the API like name, version name and click “Add” button. You can still modify the details anytime you want.
- Now your API will be created. Now go to section “API Definition” and click “Edit in API designer”.
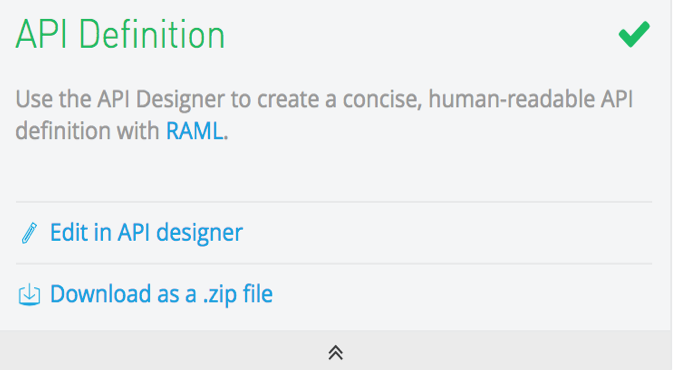
Figure 7 – Edit your RAML using API designer
- You can either paste the RAML I have provided or you can write by hand that gives you more intuition into designing RAML. One beautiful feature that I would like to mention here is that this editor provides intellisense like feature that you would find in Visual Studio if you are a Microsoft Programmer or any Eclipse based IDE if you are a Java developer. The hints provided in the API Designer will be helping you in successfully creating your RAML.
- Either if you have pasted the RAML or created by hand, you should see “Documentation” section with “Resources” created in the RAML listed out with the operations listed in the RAML.
- Enable the Mocking Service by clicking the slider and test the operations without hitting the actual endpoint.

Figure 8 – Mocking Service
- Save your RAML and you are done with defining the RAML for your service.
On a side note, RAML Tools for .NET is available in the Visual studio market place and so .NET developers now can easily integrate and consume APIs in their projects. You can find it at https://marketplace.visualstudio.com/items?itemName=MuleSoftInc.RAMLToolsforNET and the project is available in GitHub at https://github.com/mulesoft-labs/raml-dotnet-tools
In the next article, I will discuss the next step Generate application using RAML.


