JWT stands for JSON Web Token and represents claims that need to be securely transferred between two parties. JWT token is a light-weight JSON based, URI safe token and claim is a JSON object which is digitally signed with Json Web Signature (JWE) and encrypted using JSON Web Encryption (JWE).
JSON Web Token is Base 64 encoded and consist of 3 parts:
- Header
- Body
- Signature
Intended audience: Anyone interested and ready to explore JWT with Azure AD. Basic knowledge of MuleSoft API-Led connectivity and implementation using Anypoint Platform.
Prerequisites: Anypoint Platform trial or Enterprise account and Microsoft Azure trial or Enterprise account.
In order to apply policy on an API, we need to build an API. If you are familiar with MuleSoft, you should be knowing the Anypoint Platform website anypoint platform. If you are not familiar with MuleSoft Anypoint Platform, it is advisable to register and learn fundamentals course with MuleSoft. In short, Anypoint Platform provides supports for complete API life cycle and the company has their own IDE which provides platform for developers to work on the projects. More details can be found from MuleSoft website and will not be covered in this article.
Here are the steps I should be following to apply JWT validation policy on API deployed in CloudHub and Token provider is Azure AD:
- Design an API using RAML in the Design Center.
- Publish an API to Exchange.
- Open API in Anypoint Studio and customize the flows generated.
- Deploy to CloudHub.
- Set up the proxy for the application.
- Perform Application registration in the Microsoft Azure Portal
- Apply policy from API Manager
- Run the JWT validation tests.
Note: If you are already familiar with creating RAML specification, publishing to exchange, deployment to CloudHub, skip the steps from 1 – 5 and can browse the article from step 5.
Design an API using RAML in the Design Center
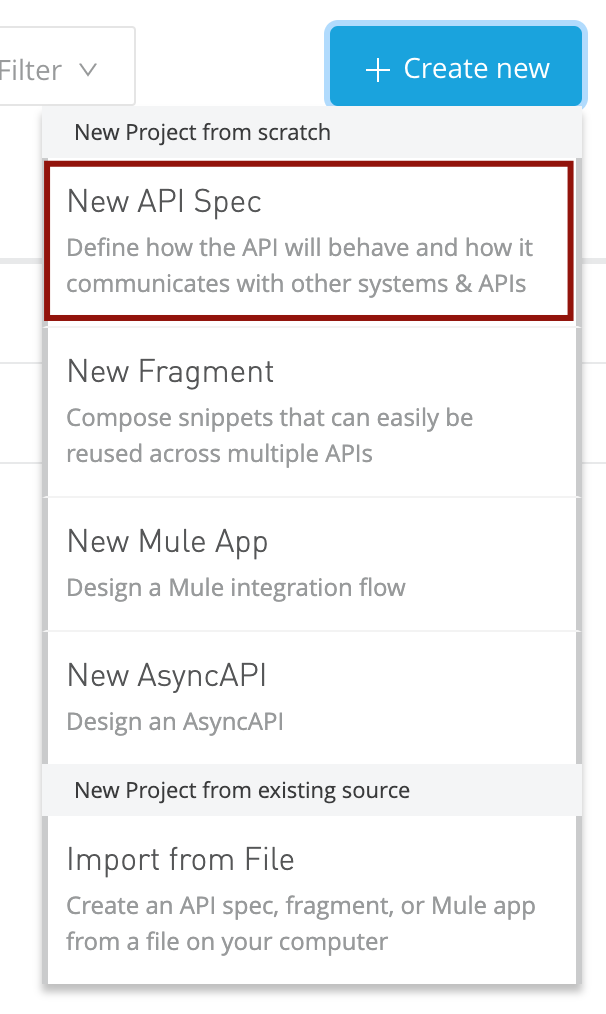
Login into Anypoint website and go to “Design Center” and click on “+ Create new” button on the top of the page.

Select “New API Spec” as we will be creating our own API using RAML.
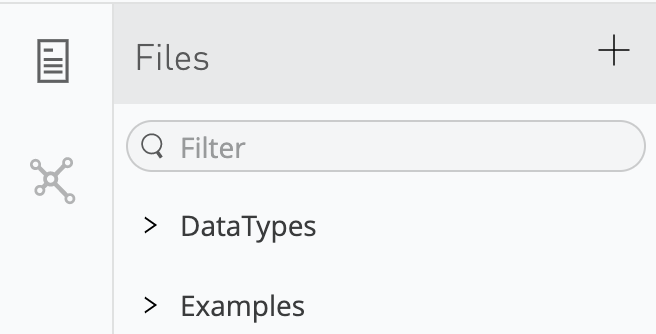
I am going to work on a sample Bank Account and so going to name the API related to Bank Account. Once the RAML API specification editor is visible, create two folders 1) Data Types 2) Examples.
Add a Data Type in the folder “DataTypes” and name the file as “BankAccount.raml” with the following content:
#%RAML 1.0 DataType

type: object
properties:
  ID? : string
  account_holder_name: string
  account_holder_type: string
  bank_name : string
  country: string
  currency: string
  customer_id: string
  last4: integer
  routing_number: string
Add two “Example” files one for account types and one for account type. I am going to name the files as “AccountExample.raml” and “AccountExamples.raml“.
AccountExample.raml
#%RAML 1.0 NamedExample
value:
    ID : ba-1234-789
    account_holder_name: John sherman
    account_holder_type: Individual
    bank_name : Best Scam Bank
    country: US
    currency: USD
    customer_id: C12345
    last4: 7777
    routing_number: r12345
AccountExamples.raml
#%RAML 1.0 NamedExample
value:
-
ID : ba-1234-789
account_holder_name: John sherman
account_holder_type: Individual
bank_name : Best Scam Bank
country: US
currency: USD
customer_id: C12345
last4: 7777
routing_number: r12345
-
ID : ba-1234-999
account_holder_name: Marie Williams
account_holder_type: Company
bank_name : Waste Bank
country: US
currency: USD
customer_id: C12346
last4: 8888
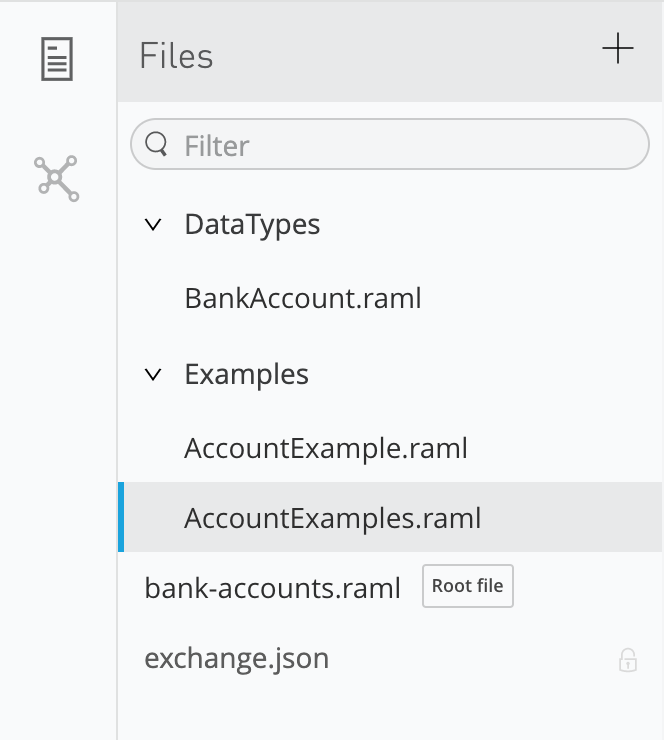
routing_number: r67890Overall folder structure looks like below:
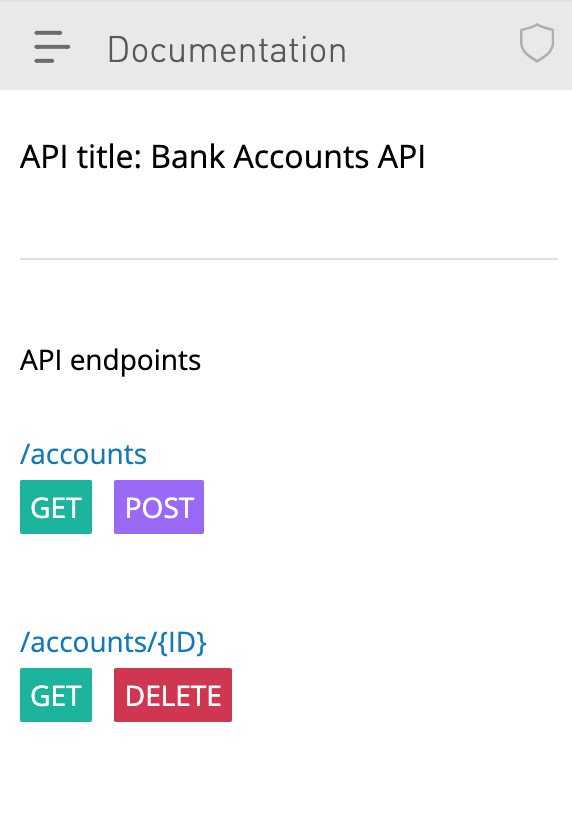
Now let us edit our RAML. I am going to add two methods get and post for accounts and add a resource attribute ID to retrieve and delete an account using the ID. Also, I am going to associate each method with data types and examples defined in the files earlier.
#%RAML 1.0
title: Bank Accounts API
types:
BankAccount: !include DataTypes/BankAccount.raml
/accounts:
get:
description: Get accounts
queryParameters:
account_holder_type:
required: false
enum:
- Individual
- Company
responses:
200:
body:
application/json:
type: BankAccount[]
examples:
output: !include Examples/AccountExamples.raml
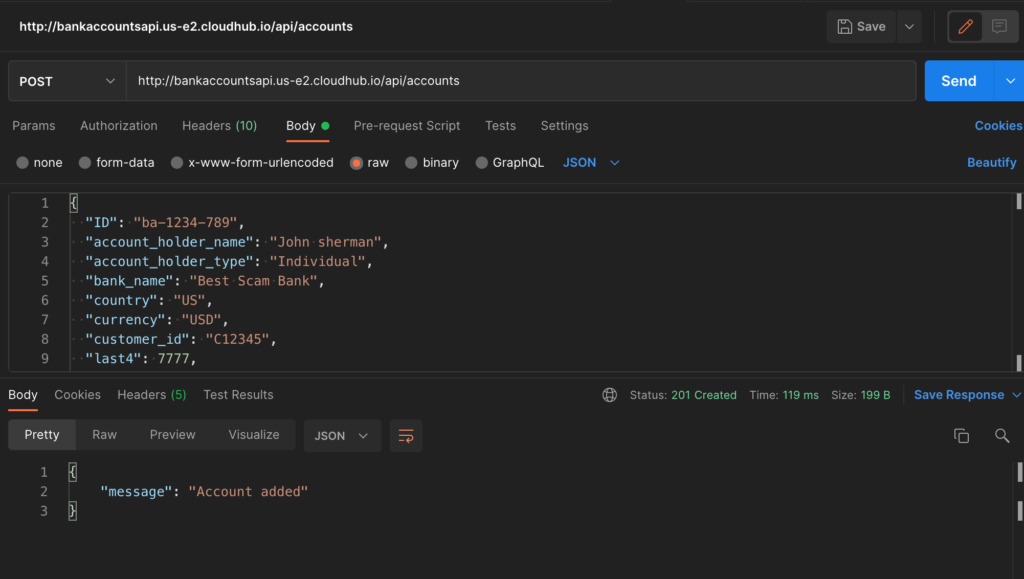
post:
body:
application/json:
type: BankAccount
examples:
input: !include Examples/AccountExample.raml
responses:
201:
body:
application/json:
example:
message: Account added
/{ID}:
get:
responses:
200:
body:
application/json:
type: BankAccount
examples:
output: !include Examples/AccountExample.raml
delete:
responses:
200:
body:
application/json:
example:
message: Account deleted
You can play with the HTTP methods to see how it works by clicking the links displayed in the “Documentation” section on the right hand side of the page.
Publish an API to Exchange
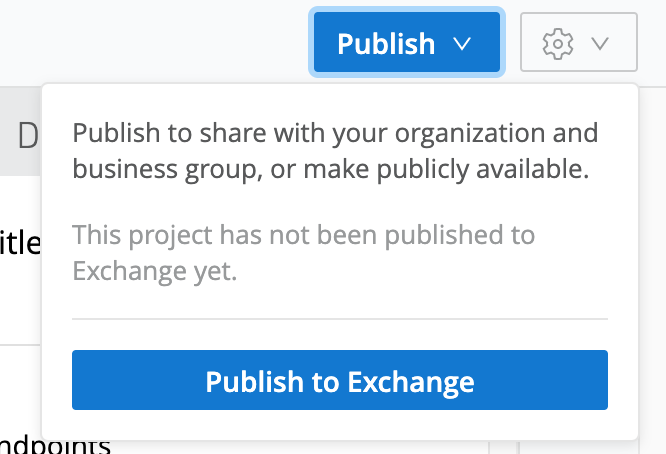
After getting the feel of API endpoints, its time to publish the API to Exchange. Exchange is central repository where we can share the assets with other members of the organization. Click “Publish” button on the top right hand side of the page and click “Publish to Exchange” button.
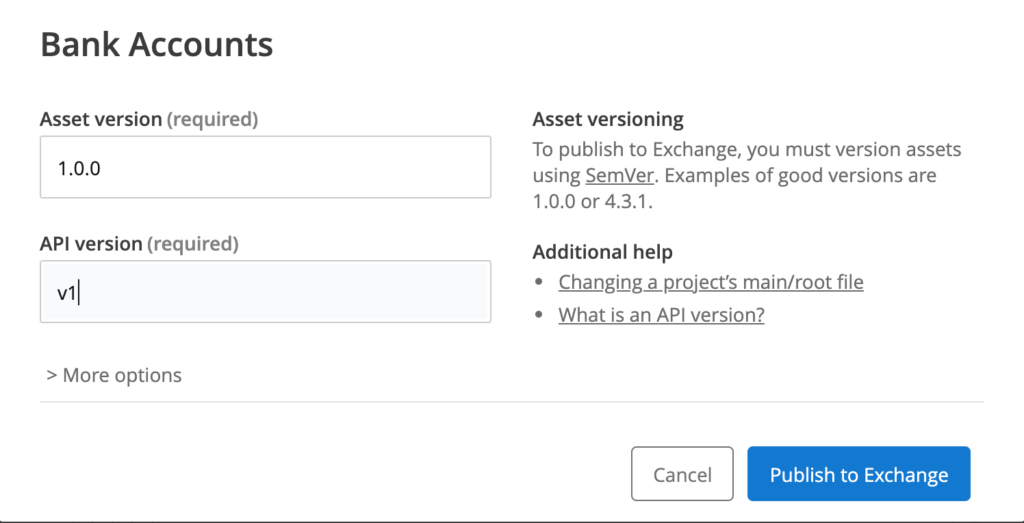
Fill in Asset version and API version inputs and click the button “Publish to Exchange“.
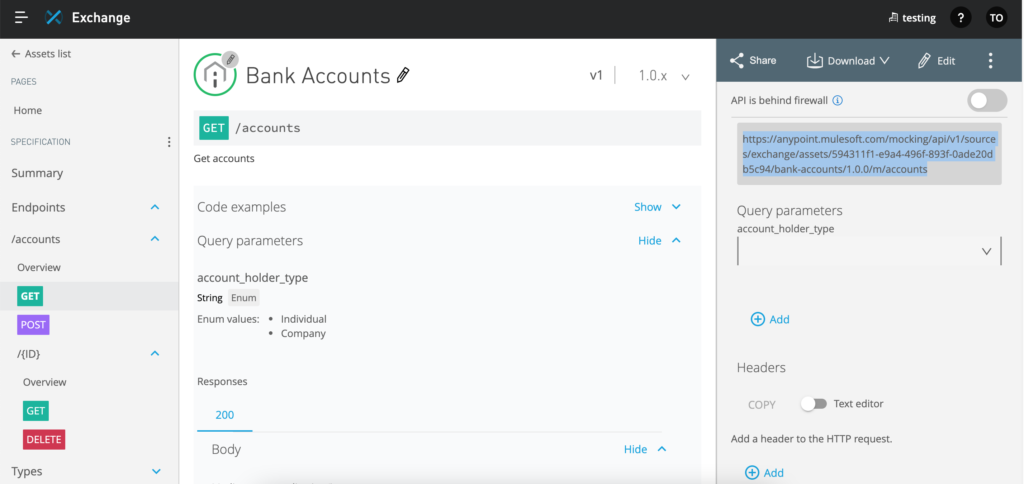
Now go to “Exchange” and you should see the “Bank Accounts” listed in the Assets section. Click on the asset and you should see the page with asset information and overview of APIs available.
Mocking service is by default enabled so that you can mock actual hits with the endpoint provided by the Anypoint Platform. In a typical life cycle of API design, at this stage, the APIs are demoed to the stake holders and their feedback will be taken.
Open API in Anypoint Studio and customize the flows generated
Now open Anypoint Studio to generate the flows using the published API asset in the previous step. We might not be making any changes. But this step is usually the next step where developers make changes to the flows to connect to actual data stores to retrieve, update, delete and create data through the APIs.
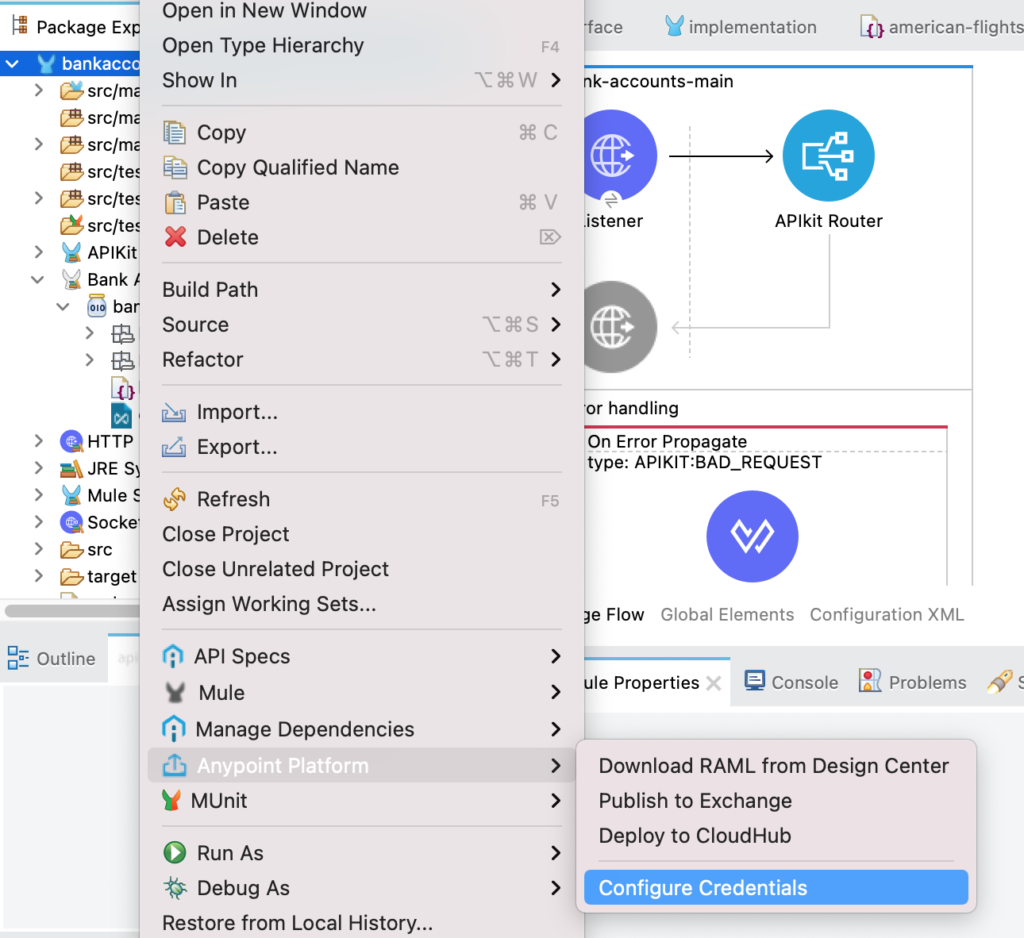
Right click on any of the existing projects and configure credentials before working with APIs as we need to connect to Exchange to add the API asset as a dependency.
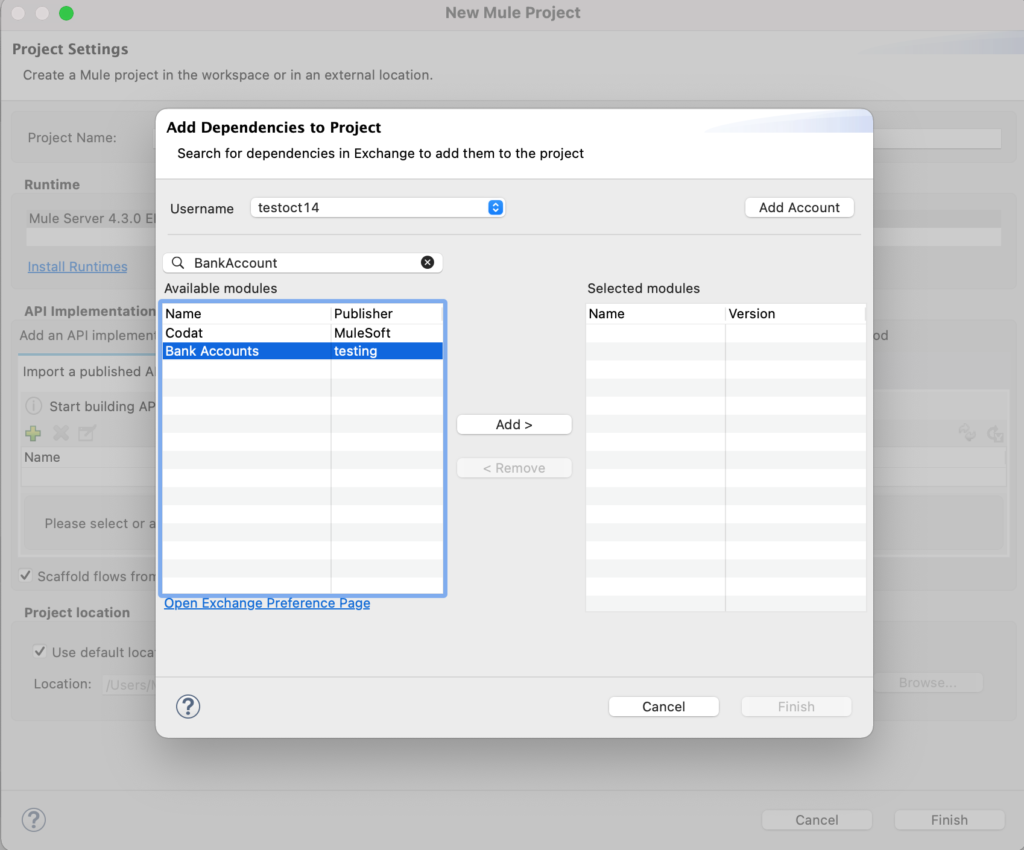
Create a new mule project and click “+” icon in the “API Implementation” section and search for the asset and select and click “Finish” button.
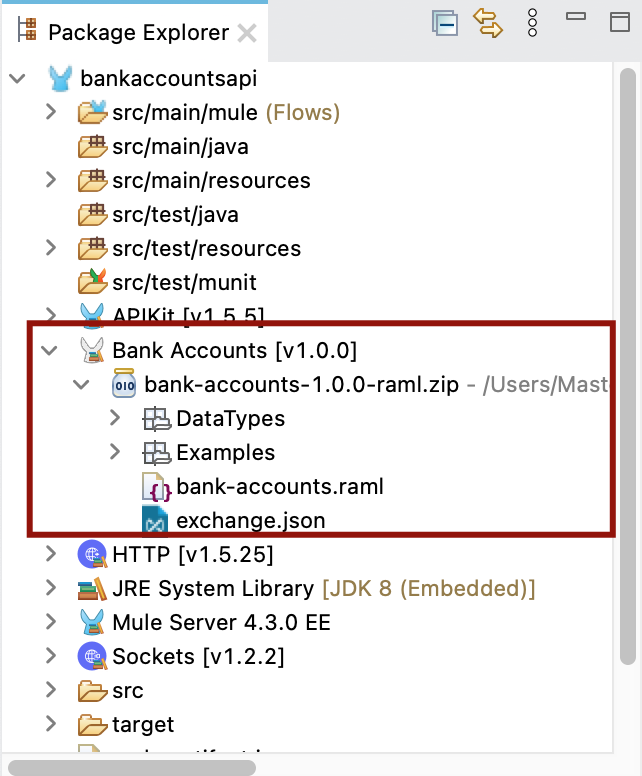
Once the dependencies are added, you should see the BankAccounts API raml zip file added to the project and flows have been generated to handle the HTTP methods designed in the RAML.
I am not going to explain much on what’s been added as it is self explanatory when you browse the flows. APIKit router is going to route the APIs based on the request type and by default, error handlers have been added in the flows and see private flows for get, post methods as well as get, post methods with ID attribute.
You can edit the transformation messages with the connectors to actual data stores to perform query, updates to the data. I will be leaving it as it is and not going to touch it for this article.
Deploy to CloudHub
Assume that we have changed mock data components with actual data connectors and application is now a realtime project. Next step is to deploy the API in the CloudHub.
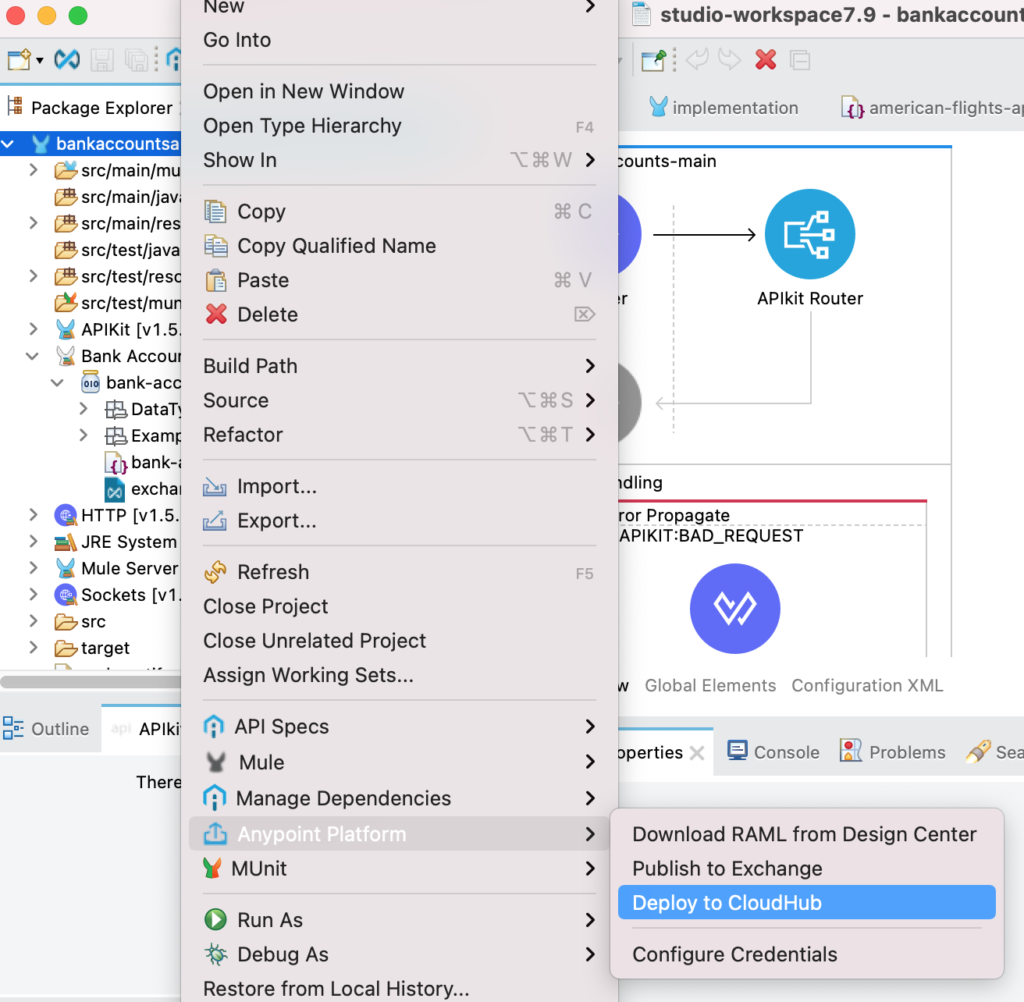
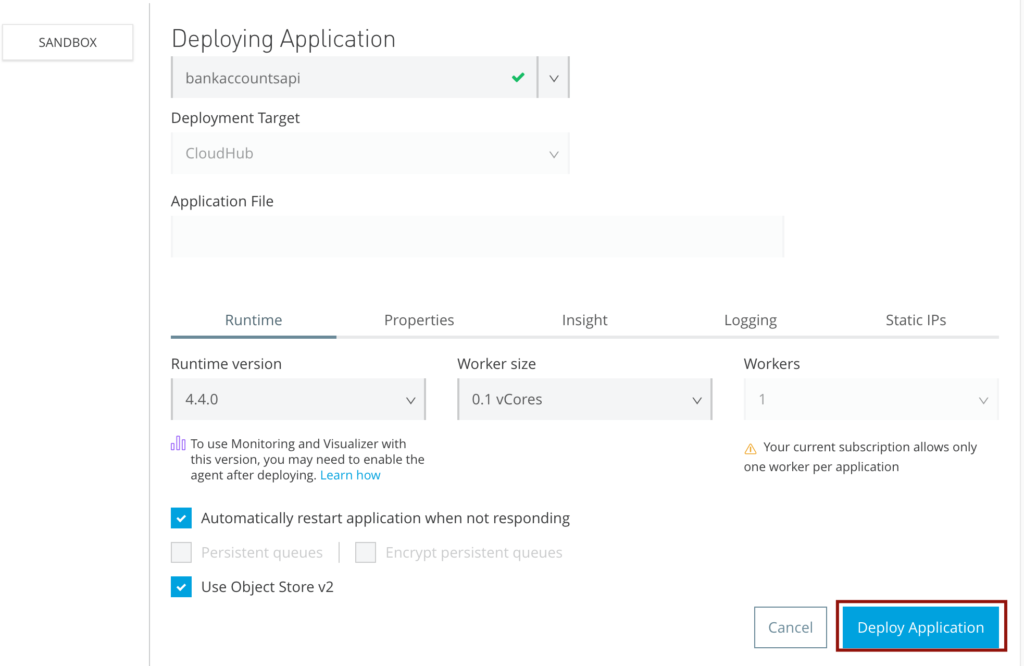
If credentials are properly configured, it should directly to the deployment window. For this article, I am not going to change any of the settings but click the button “Deploy Application“.
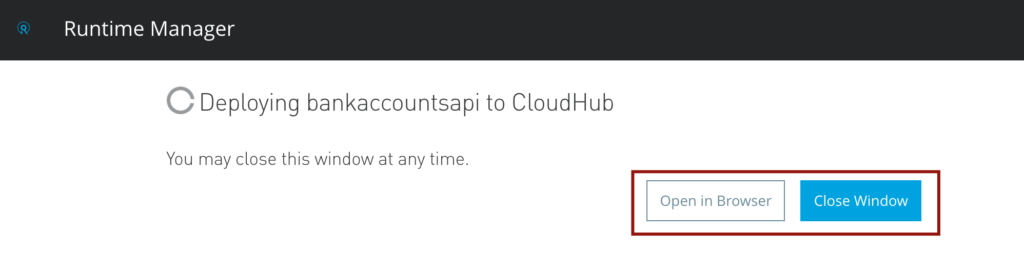
Click “Open in Browser” button and then “Close Window“.
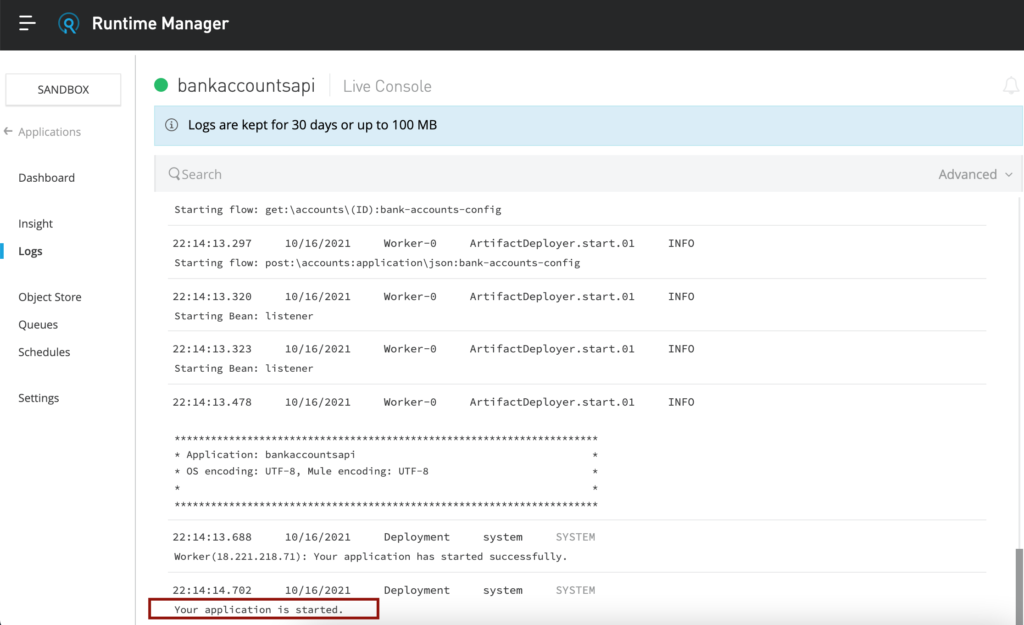
Now click on the application name and check logs. The log should display “Your application is started” and the green circle should appear before the application if everything went well.
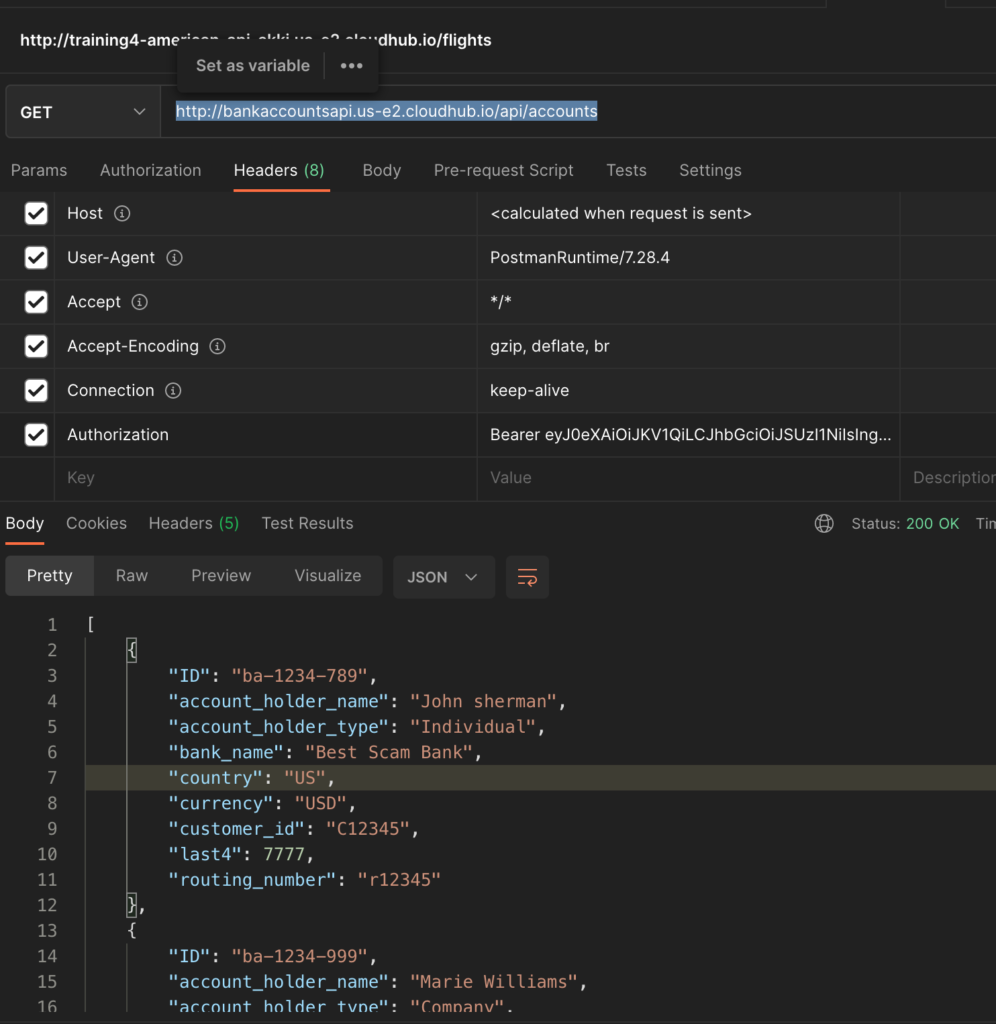
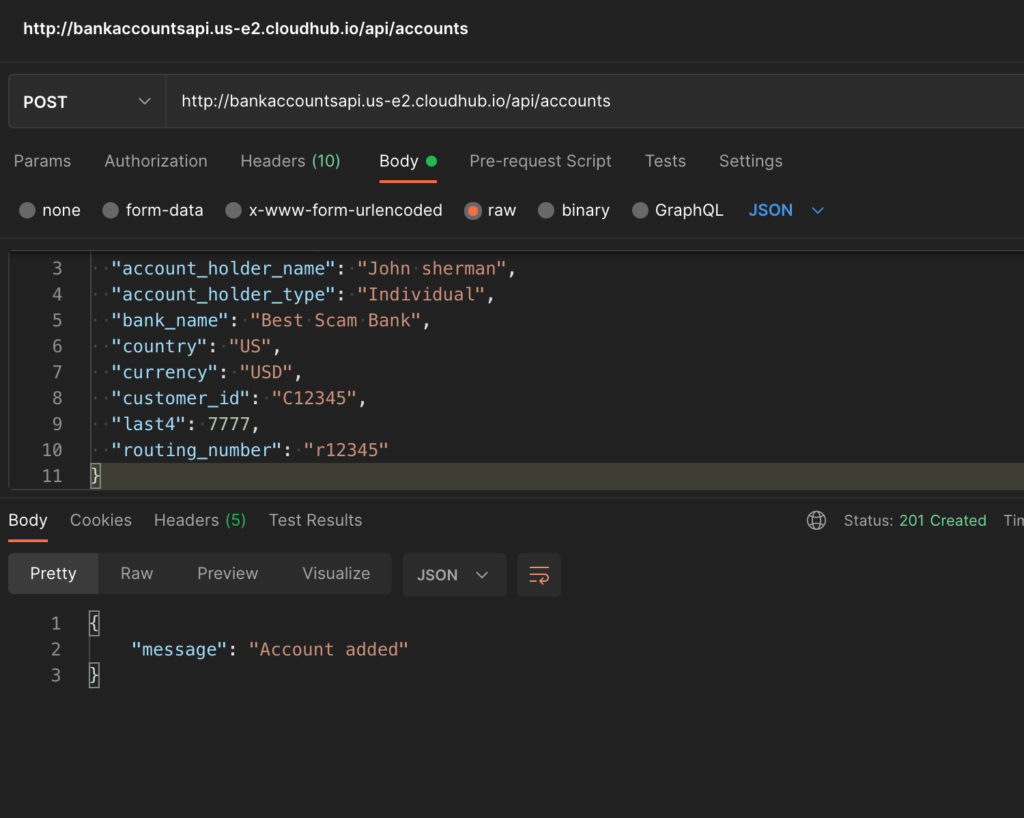
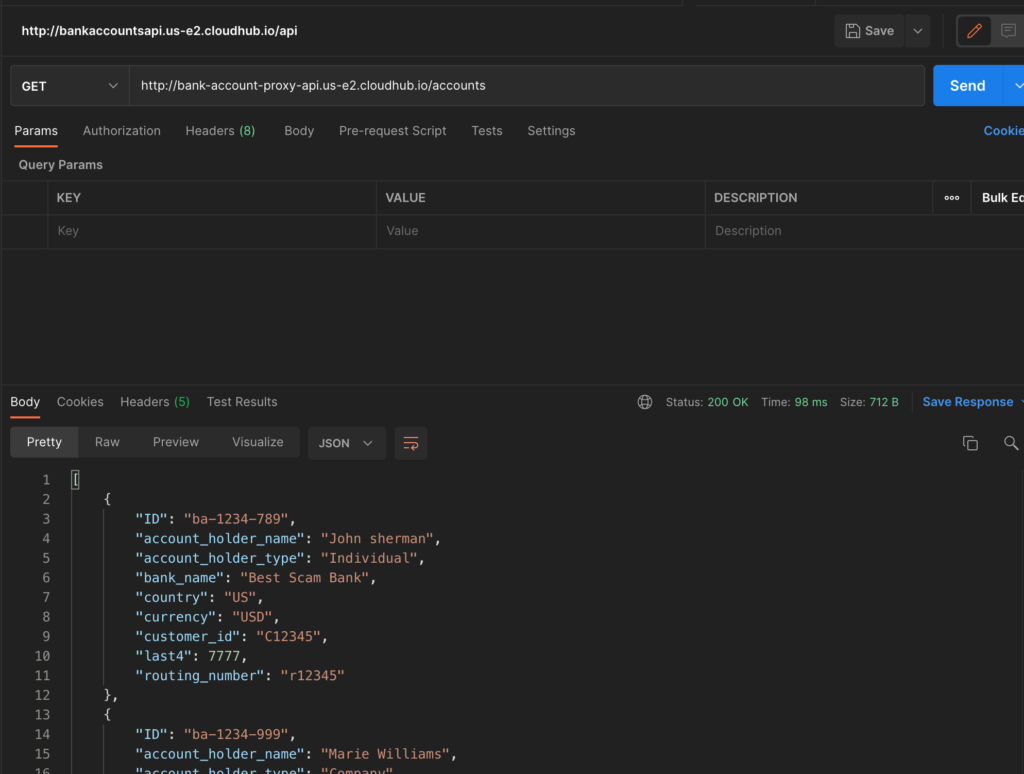
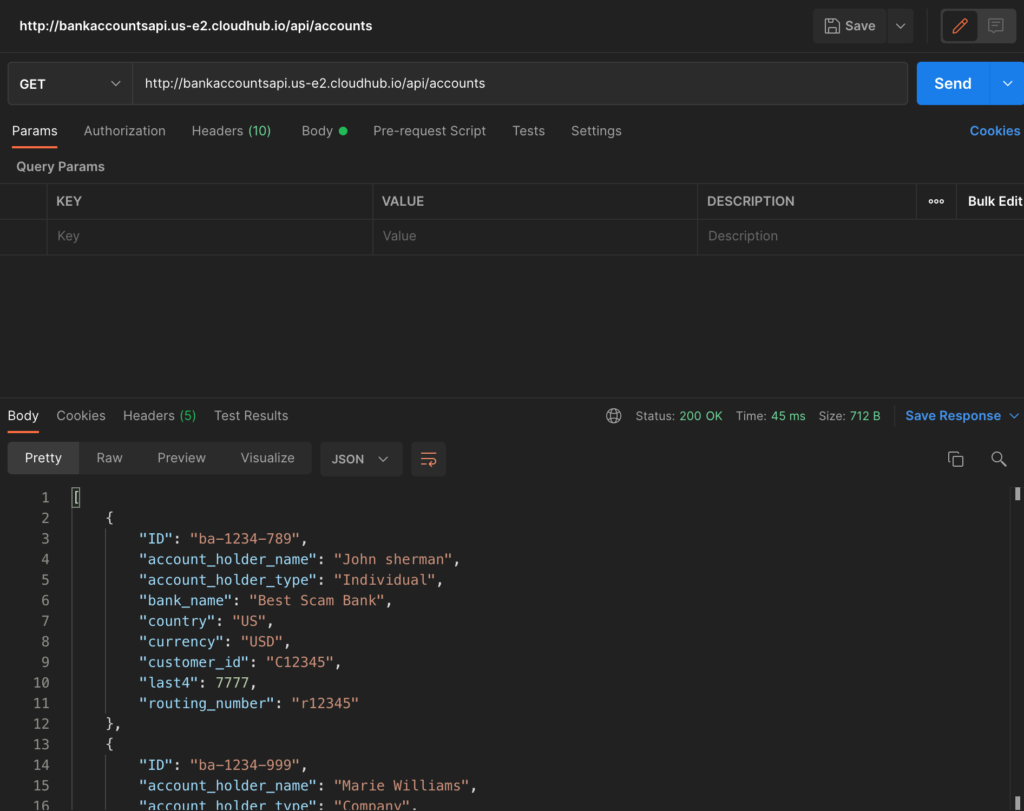
After it is successfully deployed, copy the domain URL displayed in the Dashboard page. In my case it is “http://bankaccountsapi.us-e2.cloudhub.io/” and it might differ for you based on your region.
Now check the endpoint in proxy by hitting endpoints in PostMan or any other tools.
First API: http://bankaccountsapi.us-e2.cloudhub.io/api/accounts
Set up the proxy for the application
Next step is to set proxy for the application as a proper way to secure your backend api. For achieving this, let’s go to the API Manager and create proxy. Click on “Manager API” button and select first option “Manage API from Exchange” as we have already published the API to the exchange.

In the API configurations, for API Name, enter “Bank” and it should populate the Bank Accounts API that we published to exchange along with the other properties like Asset Type. Now select “Endpoint with Proxy” for Managing Type.

Enter the Implementation URI input with the domain URL copied in the previous step. In my case it is “http://bankaccountsapi.us-e2.cloudhub.io/api“. Leave everything as it is and click on the “Save” button.
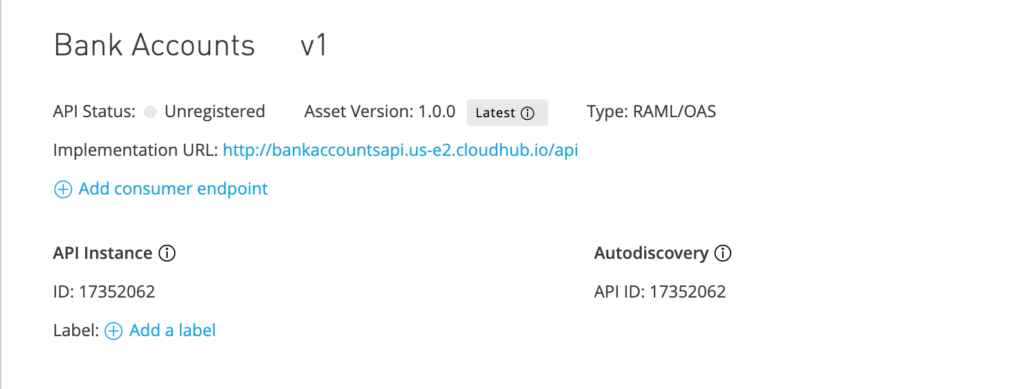
Now the proxy is saved and you should see Autodiscovery API ID shown in the page with API Instance ID. Also notice that the API Status is still “Unregistered“.
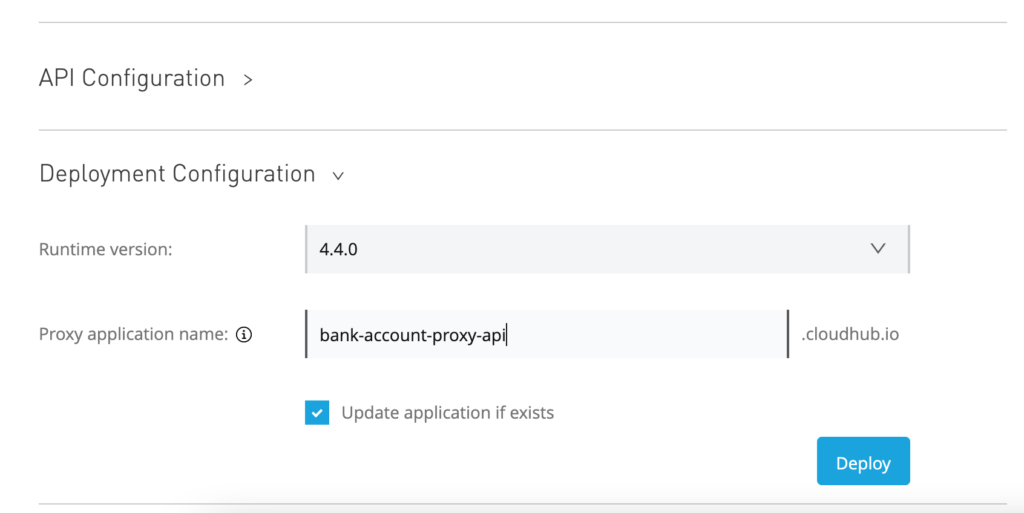
Now go to “Deployment Configuration” section in the page and select runtime version as 4.4.0 and give a name to proxy application. I have given “bank-account-proxy-api” in my case. Click “Deploy” button.
Your should see a pop up with deployment status. Once “Deploy successful” is green, close the pop up.

Now the API Status should be “Active” with green circle before it.
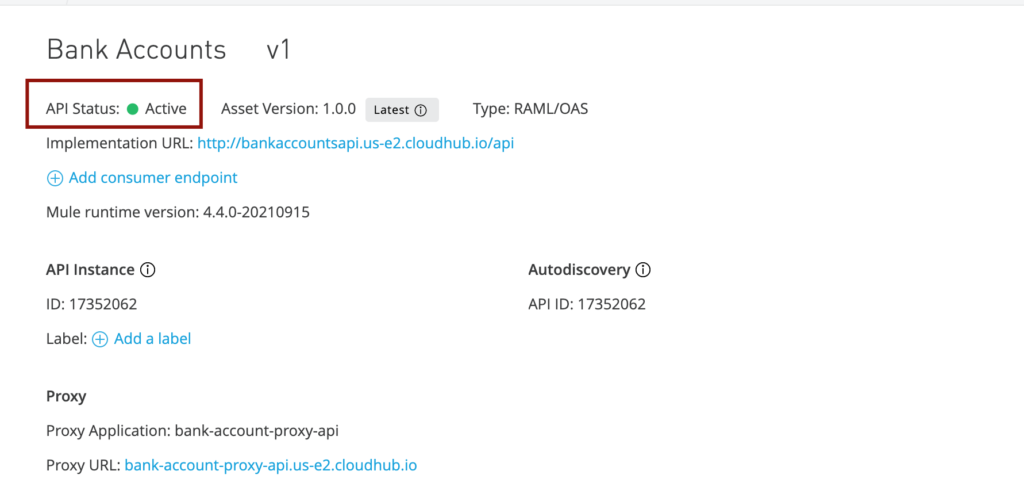
Now copy the proxy URL which is “http://bank-account-proxy-api.us-e2.cloudhub.io/” in my case and try to hit the proxy from PostMan and you should be able to hit the same endpoints and get response.
Perform Application registration in the Microsoft Azure Portal
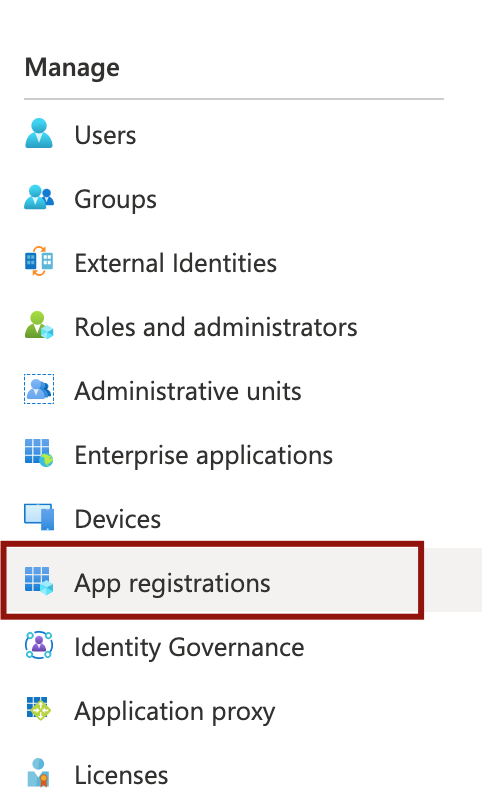
If you don’t have Microsoft Azure, you can register for trial account to follow the steps for registering the application. Login into the portal and select “Azure Active Directory” and this open a Default Directory.

In the left hand side of the page, browse the “Manage” section and click “App registrations“.
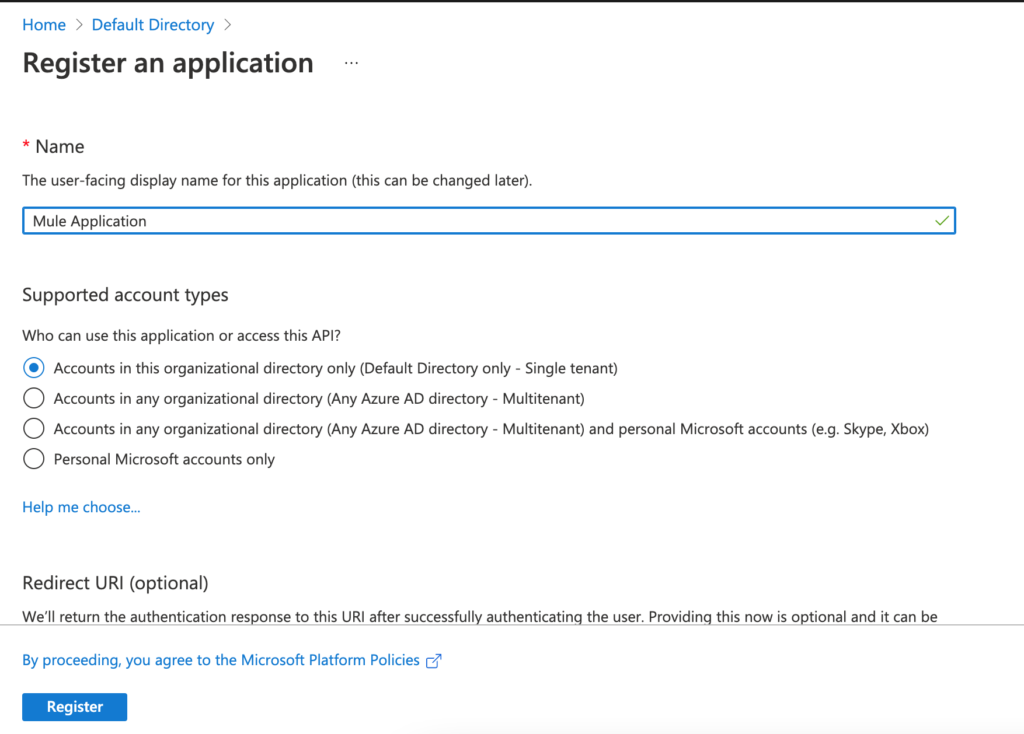
Click “+ New registration” link displayed in the page and in the page “Register an application“, enter the relevant name and click “Register” button at the bottom of the page.

I have inputted name as “Mule Application” and left the default option for “Who can use this application or access this API?” with single tenant. In actual project, it will vary based on the requirements.
Once the application is registered, you should see the details of the Application in the Application page. Here there are couple of information we need to capture so that we use while hitting the proxy endpoint after we have added JWT validation policy.
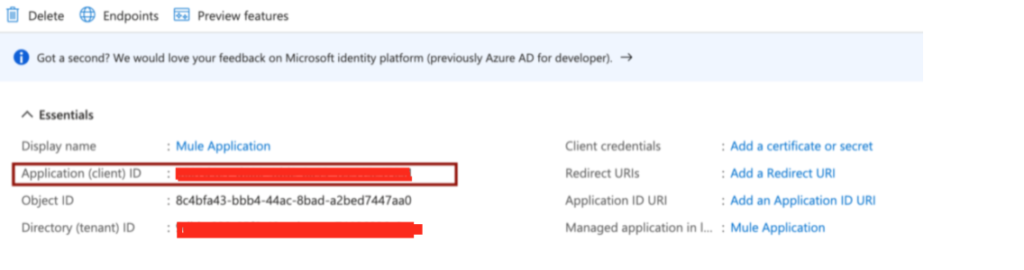
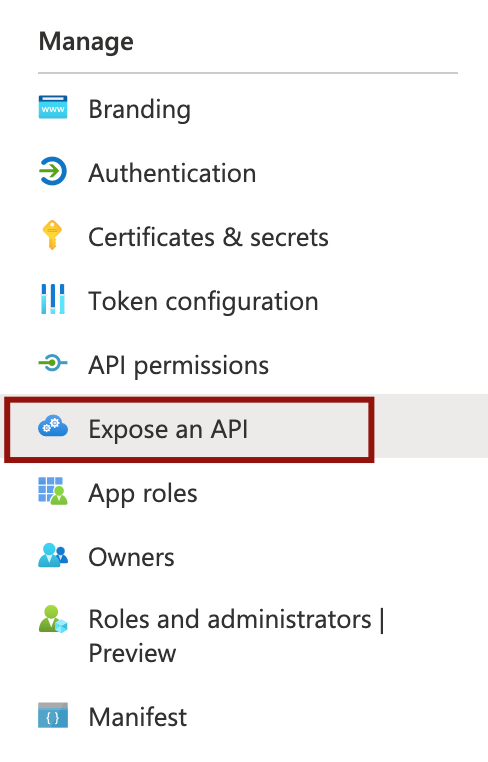
Note down the Client ID and store it in a notepad. We’ll need in next steps. Now click on “Expose an API” in the “Manage” section.
Now click on the “Set” to set the Application ID URI.
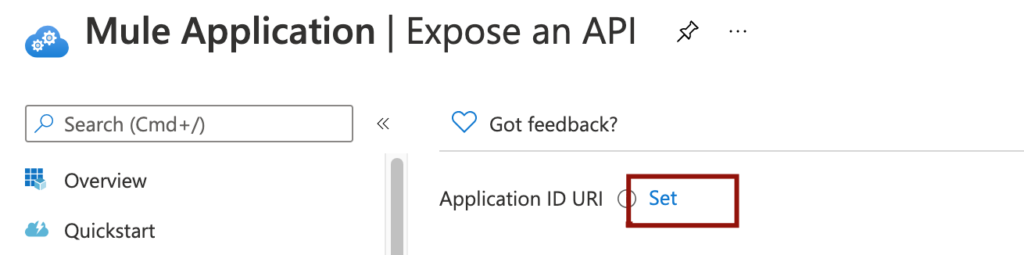
Click “Save” after Application ID URI is populated. Note down the URI.

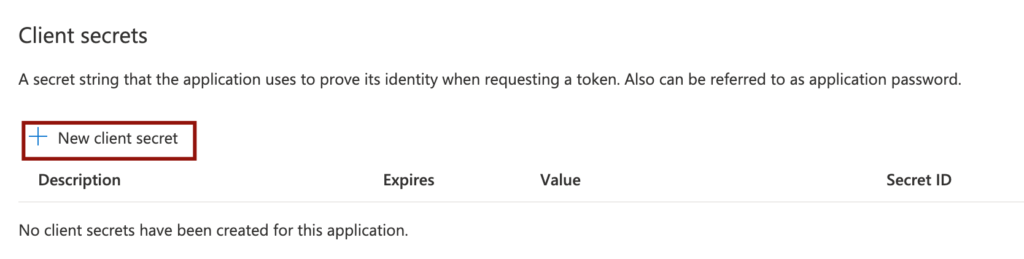
Now next step is to set the Client Secret. Click “Certificates & secrets” in the “Manage” section.
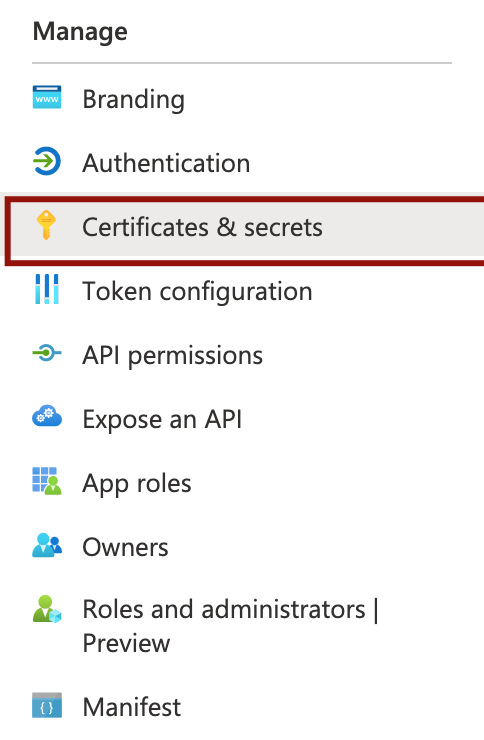
Now click “+ New Client Secret” in the “Client secrets” section.
Now add a description and set when the secret expires. Click “Add” button at the bottom of the page.
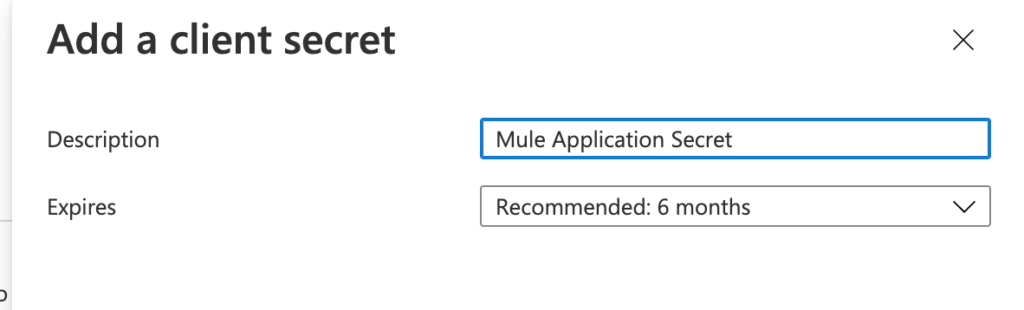
Now copy the value and store it so that we can use it later when requesting the token.

This completes our configuration on the Azure side. Next step is to configure the validation policy for the proxy api in the Anypoint Platform.
Apply policy from API Manager
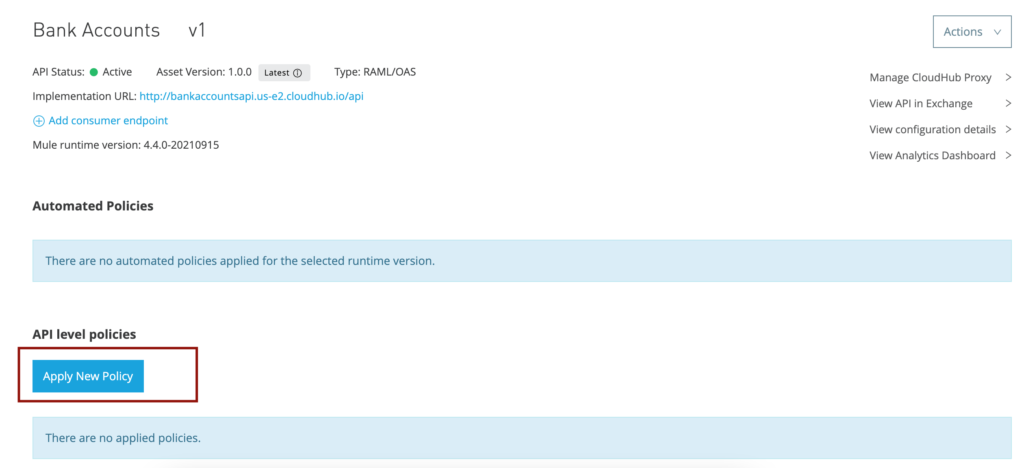
Now let’s get back to API Manager in the Anypoint Platform and click on the “Bank Accounts” API URL which should take us to Settings page.

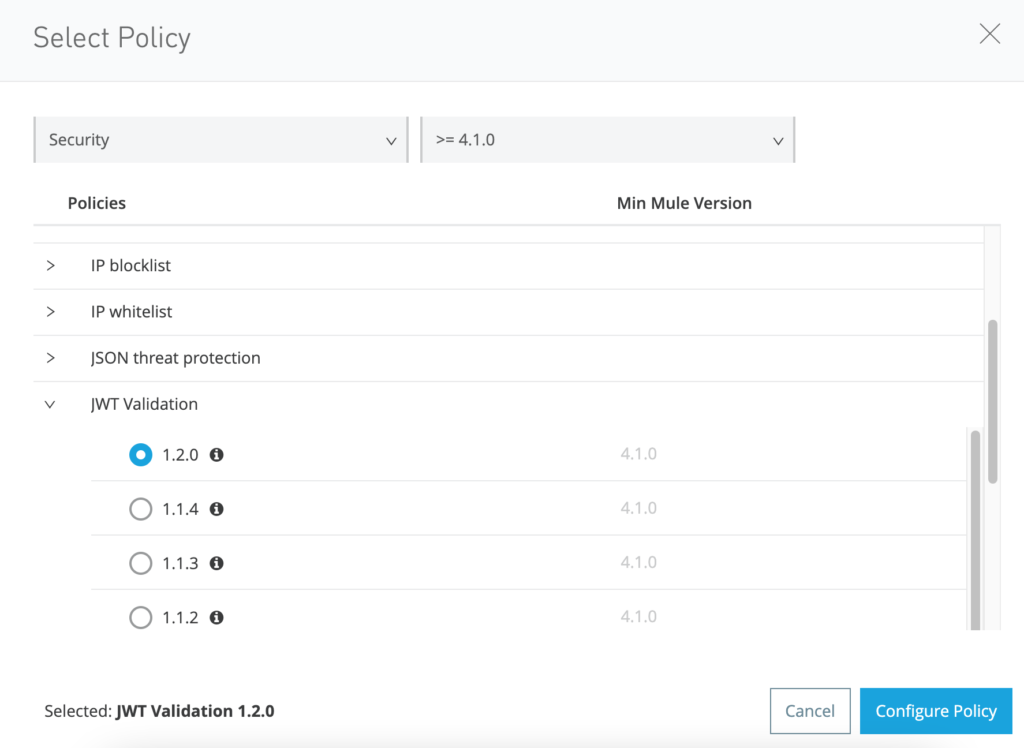
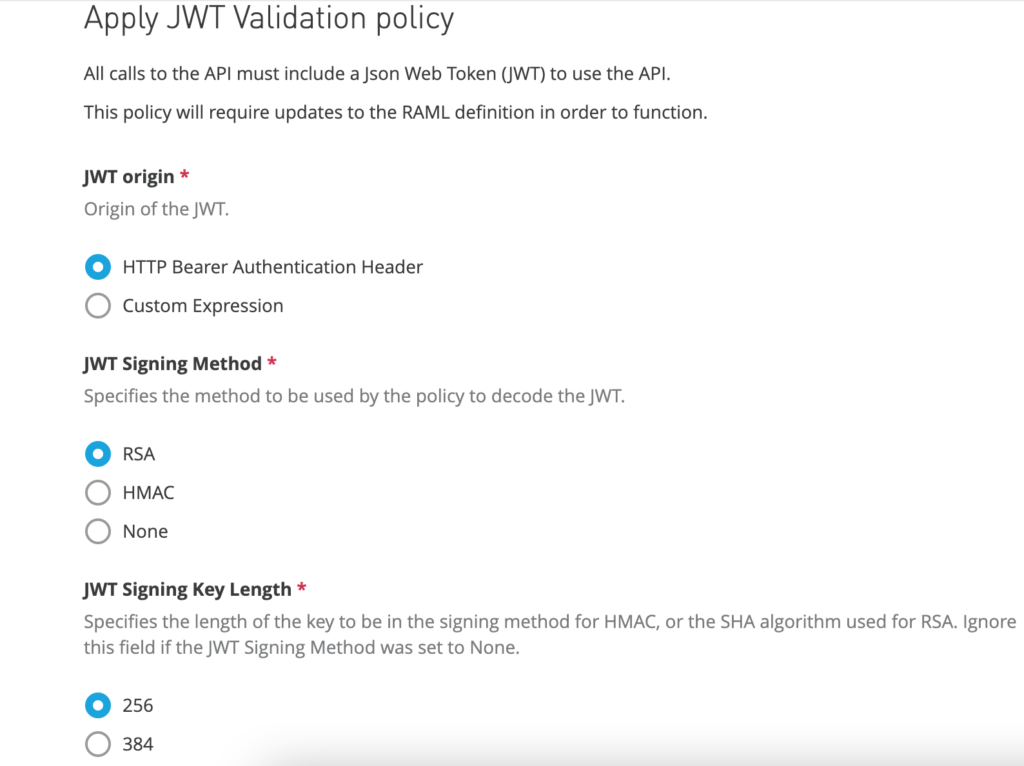
Let’s add a new policy by clicking the button “Apply New Policy” and selecting “JWT Validation” from the available in the Security Validation. Select the latest version. In my case it is 1.2.0. Click “Configure Policy” button after selecting the policy.
Here are some of the properties that are needed for this article. You can skip or update other properties as you need it.
| Policy Property | Value |
|---|---|
| JWT origin | HTTP Bearer Authentication Header |
| JWT Signing Method | RSA |
| JWT Signing Key Length | 256 (Look out for checking the supporting key length and other information here) Hit this link in the Postman or any of your favorite tool https://login.microsoftonline.com/common/v2.0/.well-known/openid-configuration and you should see the following in the response: “id_token_signing_alg_values_supported”: [ “RS256” ] |
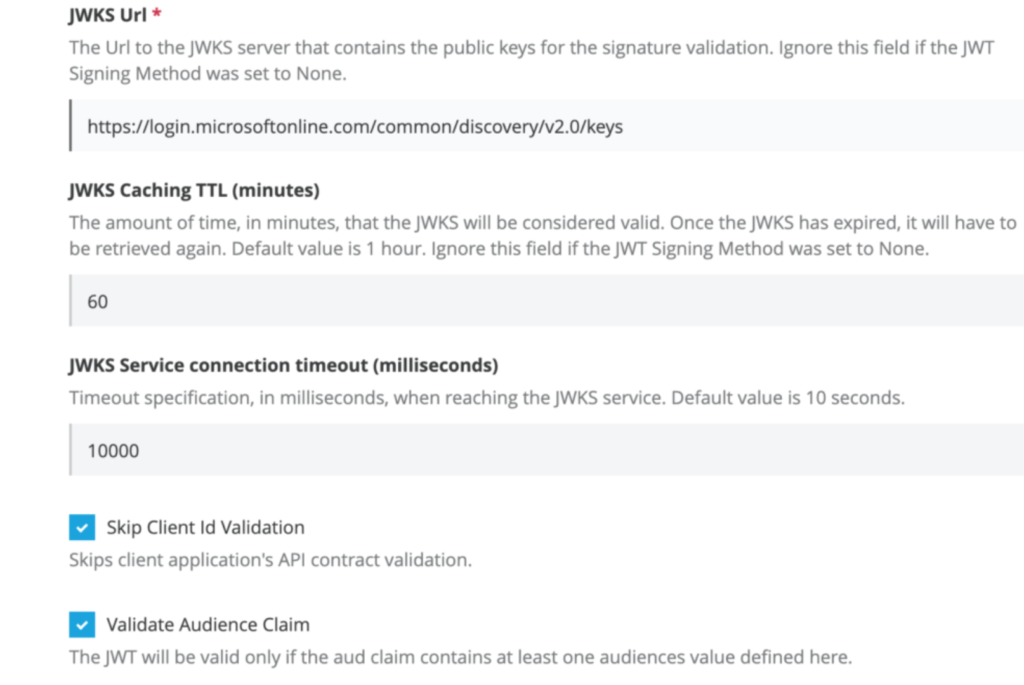
| JWT Key origin | JWKS |
| JWKS Url | You can find the URL from the response from https://login.microsoftonline.com/common/v2.0/.well-known/openid-configuration that you hit earlier to find out the JWT Signing Key Length jwks_uri”: “https://login.microsoftonline.com/common/discovery/v2.0/keys“ |
| JWKS Caching TTL (minutes) | 60 |
| JWKS Connection Timeout (milliseconds) | 10000 |
| Skip Client Id Validation | checked |
| Validate Audience Claim | checked |
| Audience Claim Values | Provide the application URI that we generated during application registration in Azure. In my case it is api://3607d4e1-d680-4dd2-8a99-1cc415c47651 |

Note in the Anypoint platform, the policies are applied to proxy if you have set up proxy with option “Endpoint with Proxy” while deploying the API. Otherwise, policies are applied to the application itself.
Run the JWT validation tests
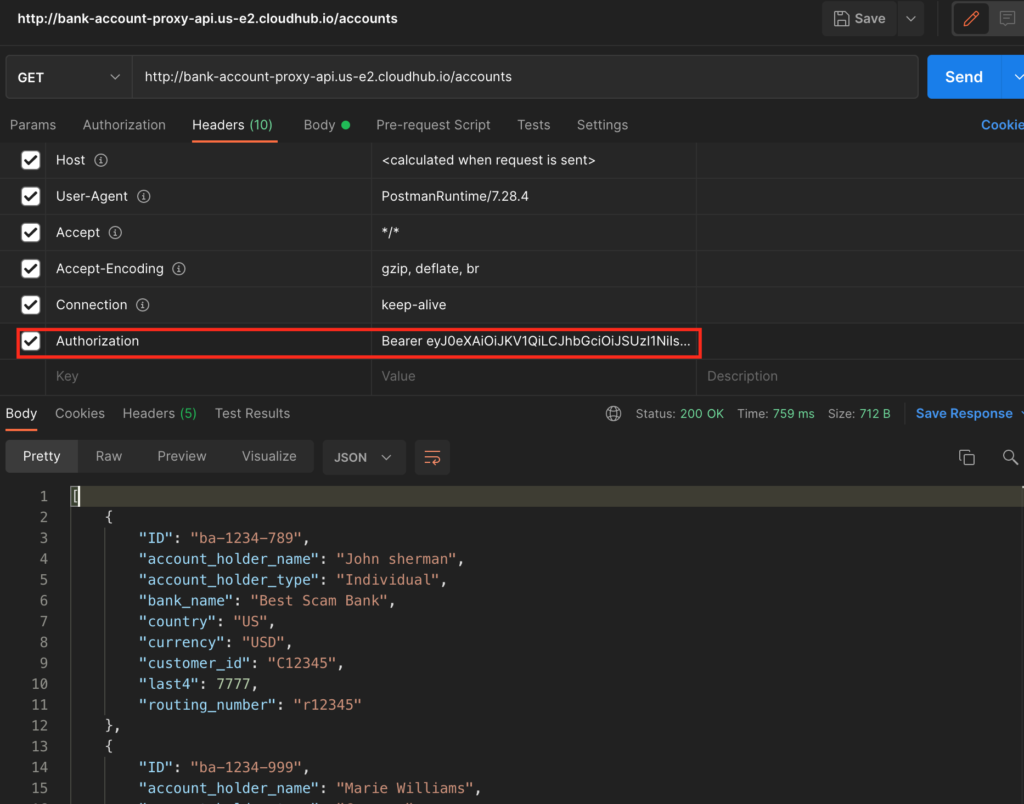
Let’s test the policy by hitting the application and the proxy. We should see still we should be able to hit the application endpoint without any issue, but for proxy it should throw error.
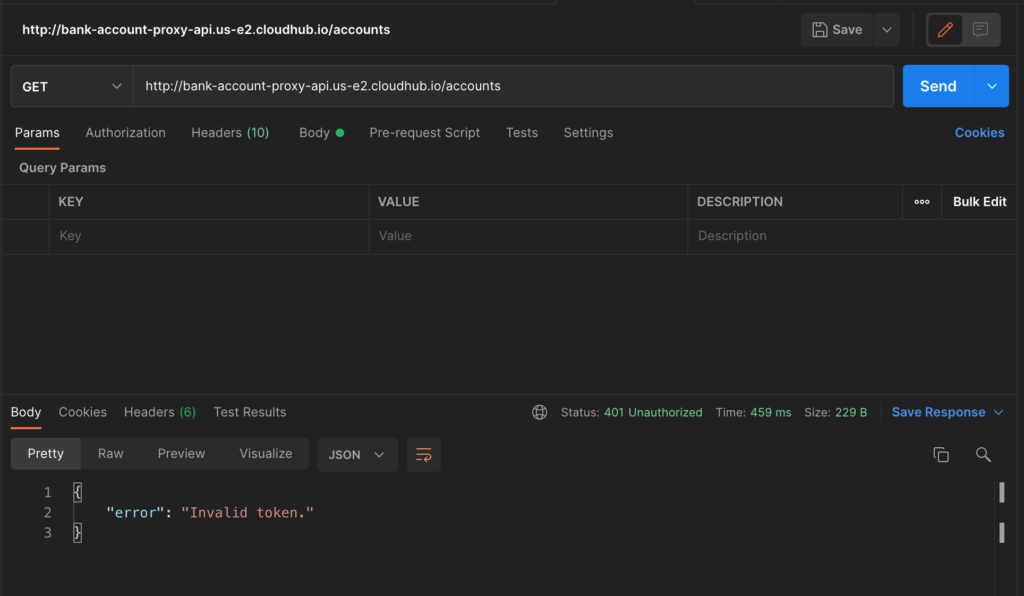
Notice in the figure 44, hitting the proxy endpoint has thrown back 401 status. In order to fix this, now we need to provide JWT token.
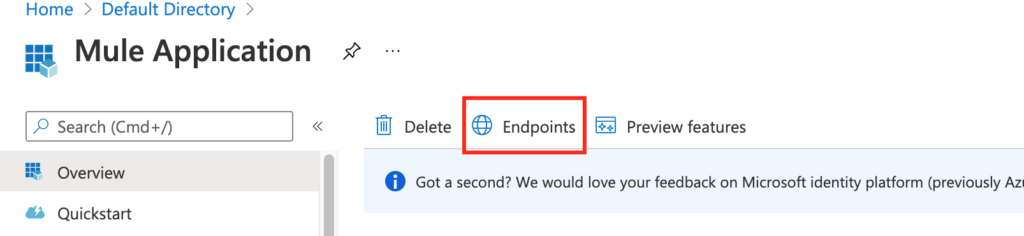
In order to get the JWT token, we need to first hit the azure /token by providing the client credentials. Go back to Azure Portal and click on the application name that we registered in the Azure AD and in the overview screen, click “Endpoints“.
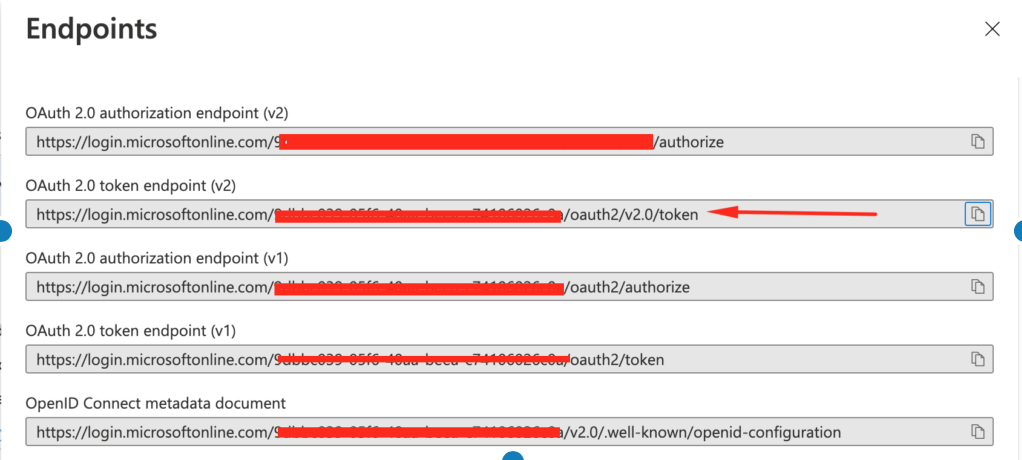
You should see the list of supported endpoints and we are interested in OAuth 2.0 token endpoint(v2) and so copy the URL from there.
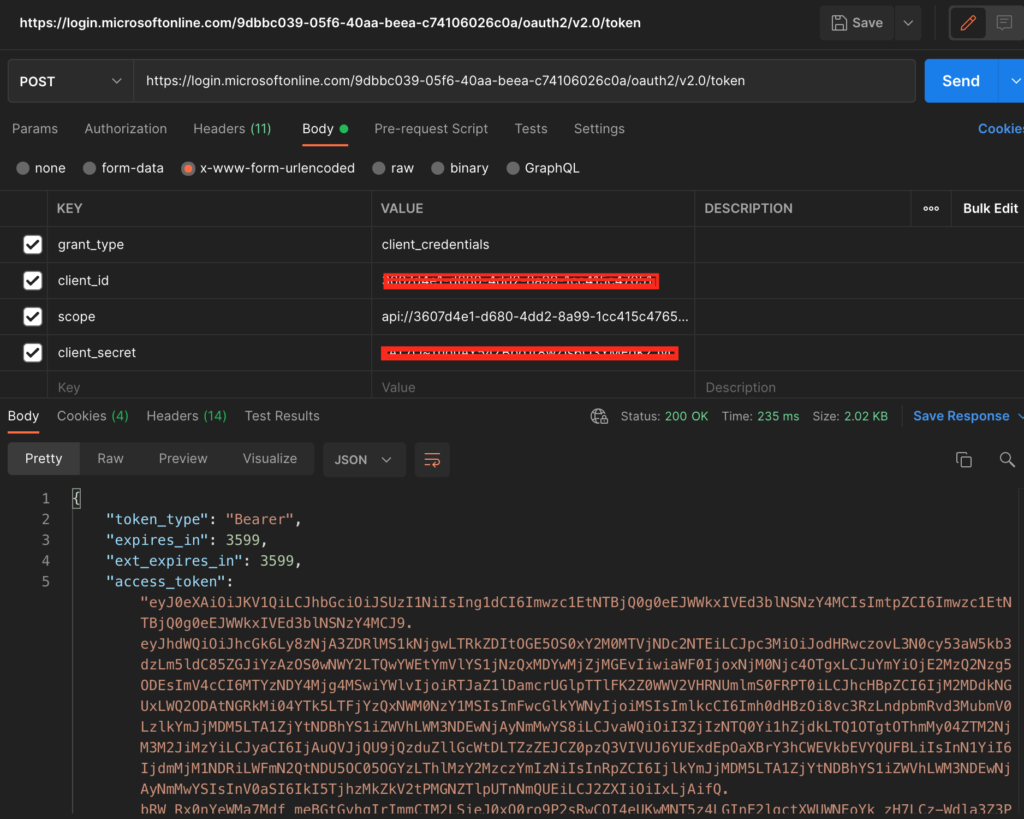
Now hit the URL copied in the Postman and provide body with the following values and copy the access_token value in the response:
| grant_type | client_credentials |
| client_id | client_id copied from the azure portal (application id) |
| client_secret | Secret value copied from the azure portal |
| scope | api://3607d4e1-d680-4dd2-8a99-1cc415c47651/.default |
Add the “Authorization” in the Header key and value as “Bearer <access_token_copied>” and hit the proxy endpoint that we hit before. This time, instead of 401 status should return 200 with the response that we expected.