This article is not going to discuss more on Cosmos DB. For any information on Cosmos DB you can refer Microsoft’s website https://docs.microsoft.com/en-us/azure/cosmos-db/mongodb-introductionand Microsoft has provided pretty much everything needed for building solutions for connecting to Cosmos DB.
Targeted audience:Any MuleSoft developer who has built applications using MongoDB connector previously and moving to Cosmos DB or new developers who want to play with Cosmos DB’s API for Mongo DB.
As per Microsoft’s information on the wire protocol compatibility it supports wire protocol for MongoDB and also supports the standard MongoDB connection string URI format. But we need to make sure that the communication happens on secured channel.
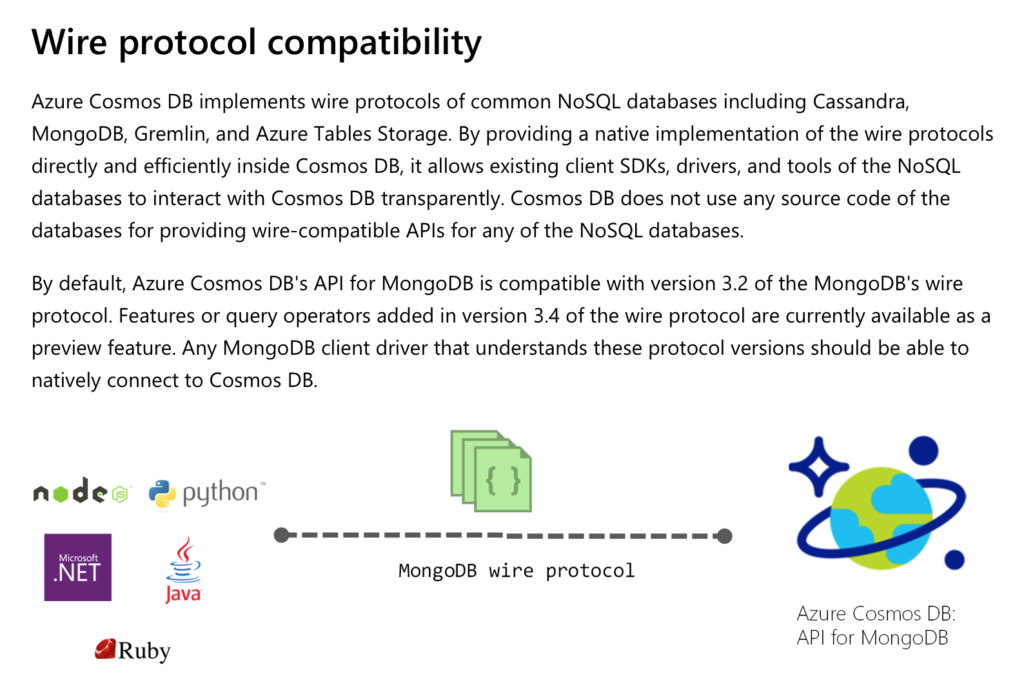
Figure 1 – Wire protocol compatibility (From Microsoft website)
In this article I am going to create a simple application that connects to Azure Cosmos DB’s API for MongoDB. Fortunately, the connection string remains the same except we need to specify SSL=true which we would be discussing further in the article.
First, we need to provision Azure Cosmos DB’s API for MongoDB. Follow me along step by step in order to complete the exercise.
Open portal.azure.com and login into the Azure portal. Click on “Create a resource” link.
Figure 2 – create a resource
Select “Azure Cosmos DB”.
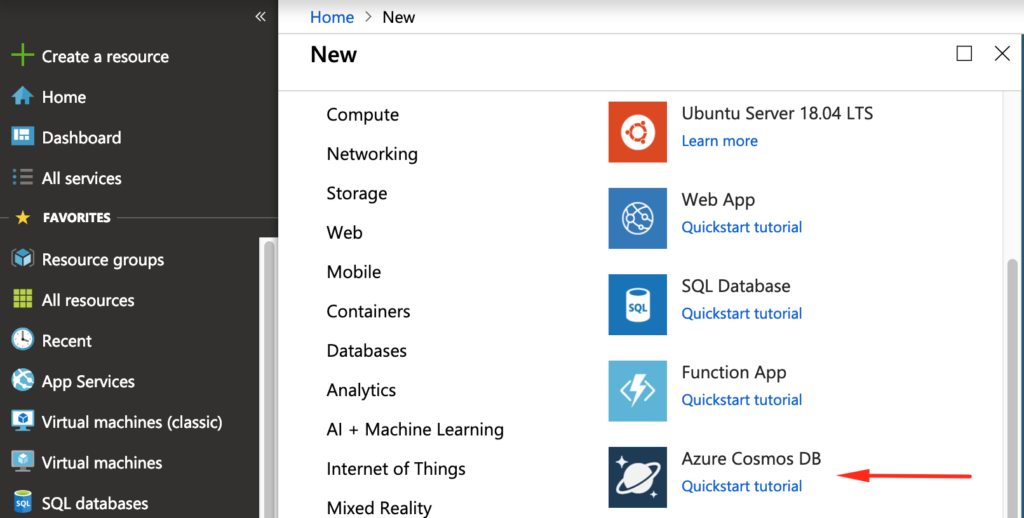
Figure 3- Create Azure Cosmos DB
Select your subscription. My subscription is Pay-As-You-Go and I select that. Create a resource group “testcosmos”. Enter “Account Name”. It should be unique and should see green tick mark after you moved out of the textbox for “Account Name”.
Do not forget to change the “API” with “Azure Cosmos DB for MongoDB API”, as the default selected value is “SQL API” i.e. “Core (SQL)”. Also choose location of the data center that is near to your location for easy connection.
Also, I have disabled the “Geo-Redundancy” by clicking on the “Disable” button across the text. Since I am trying to play around with the feature, I do not require the redundancy factor for this exercise.
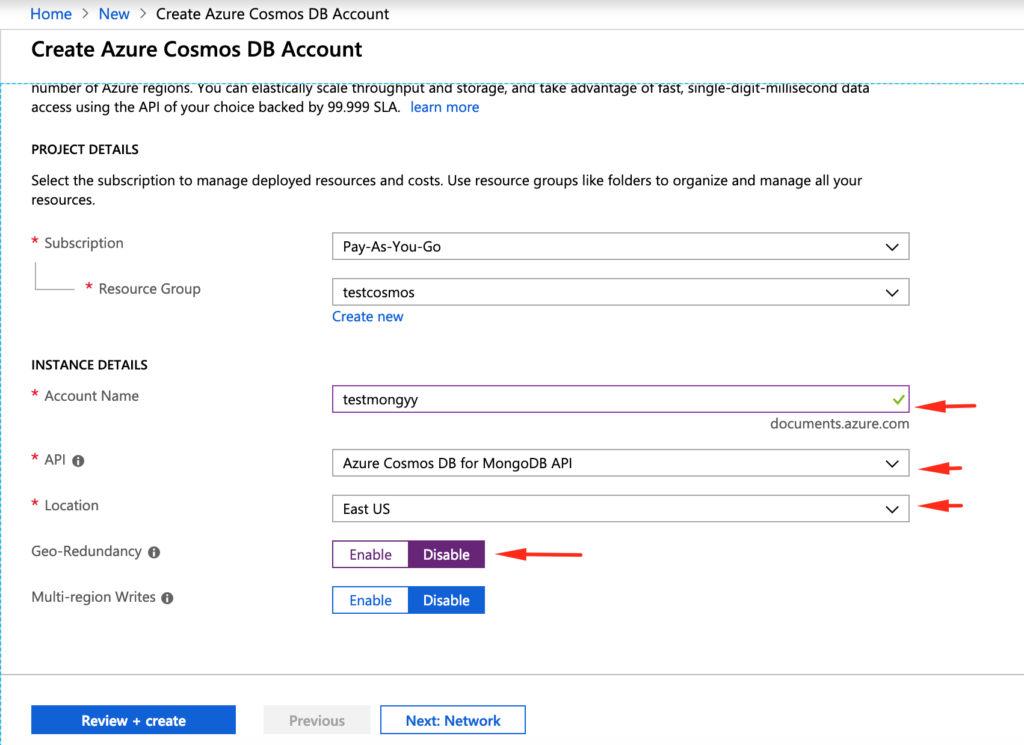
Figure 4 – Create Azure Cosmos DB account
Now click on “Review + Create” button and click “Create” button in the next step. You should see “Validation Success” message in the next step.
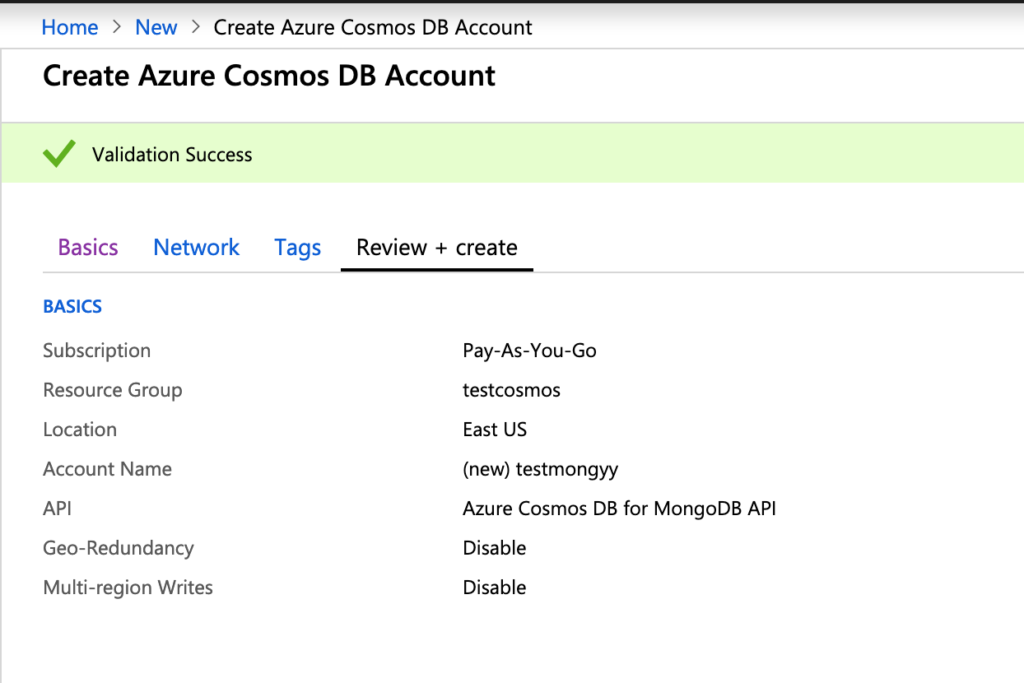
Figure 5 – Validation Success
Wait for few minutes to get the deployment complete. Watch for the message “Deployment succeeded” in the “Notifications” window. You can opt to click it on “Pin to dashboard” which will add a shortcut on your dashboard page. If you click “Go to resource” it will take you to the Azure Cosmos DB account page.
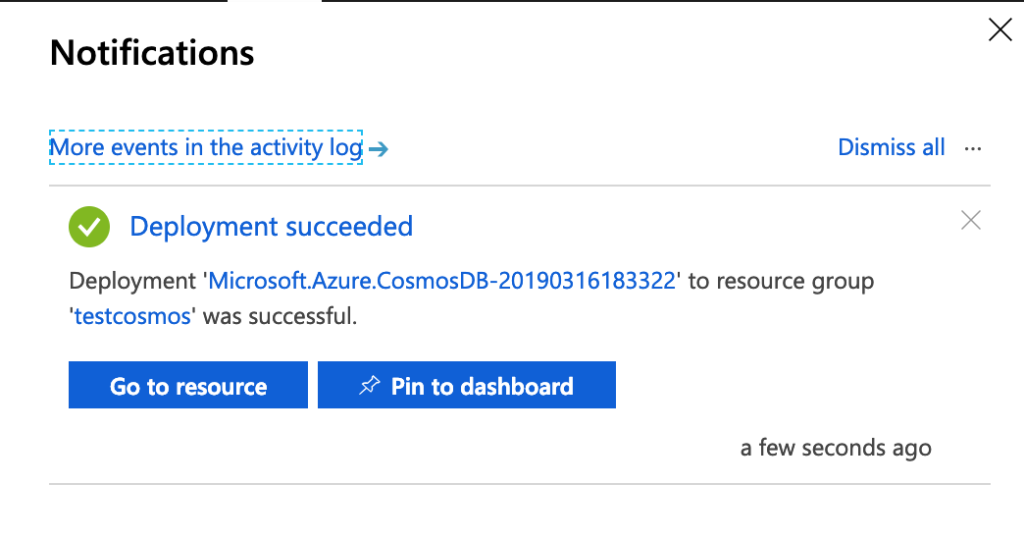
Figure 6 – Deployment succeeded
You should see that “Quick start” is selected by default with landing page and on the right-hand size, you should see the code for connecting MongoDB using different languages. Since we are not going to connect using programming language, we can skip it for now.
Go to “Settings” tab and select the “Connection String” link. You should see the keys displayed on the right-hand side of the page.
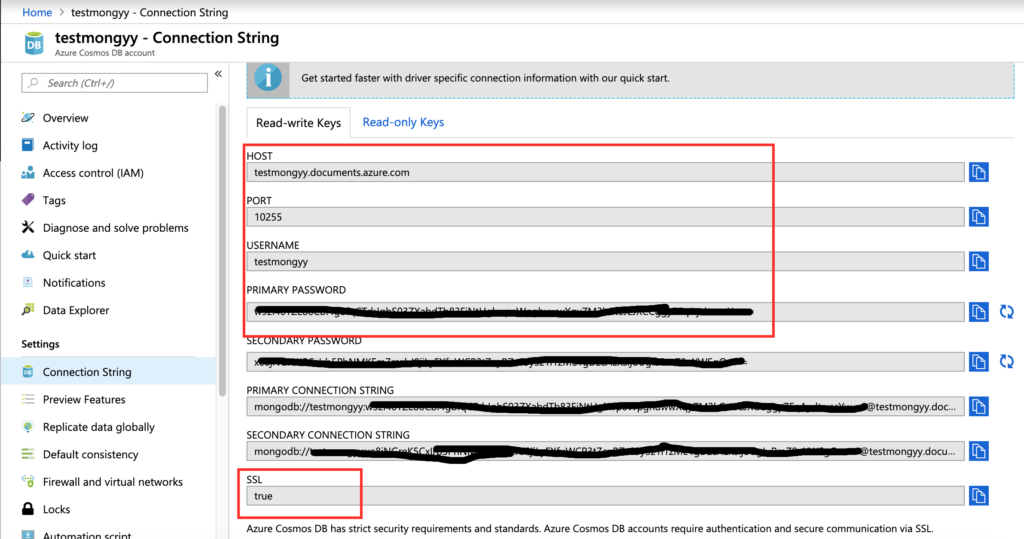
Figure 7 – Connection String
We are interested in noting down the Host, Port, Username and primary password in order to connect from Mule.
Note:You can first create Database and Collections using Data Explorer or you can specify the DB/Collection names in Mule connector properties and MongoDB connector will create a request to create them. In production systems, we should not be creating databases and collections if they do not exist. But, for now we can take the short cut.
In case if you want to follow standard practice of creating database and collection first, then click “Data Explorer” in the “Overview tab”.
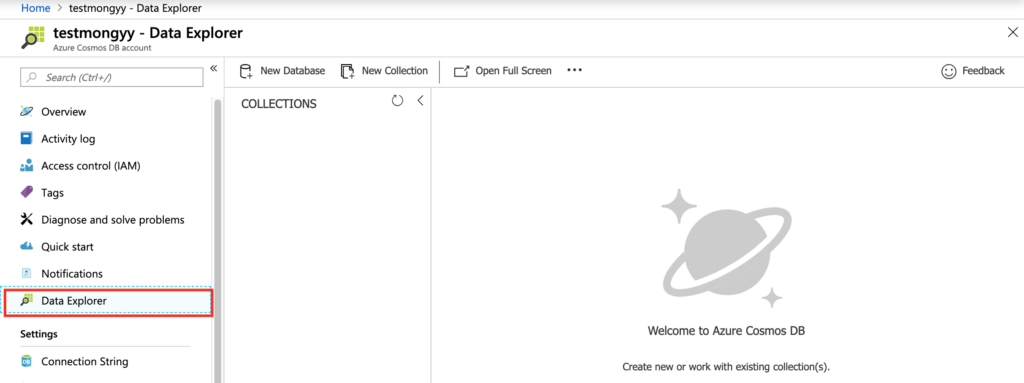
Figure 8 – Data Explorer
Click “New Database” and create a database as shown in Figure 9 and then create a collection by clicking “New Collection” link as shown in Figure 10.
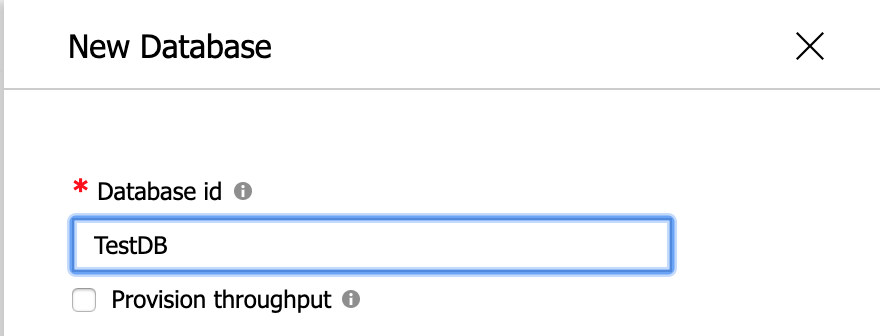
Figure 9 – Create Database
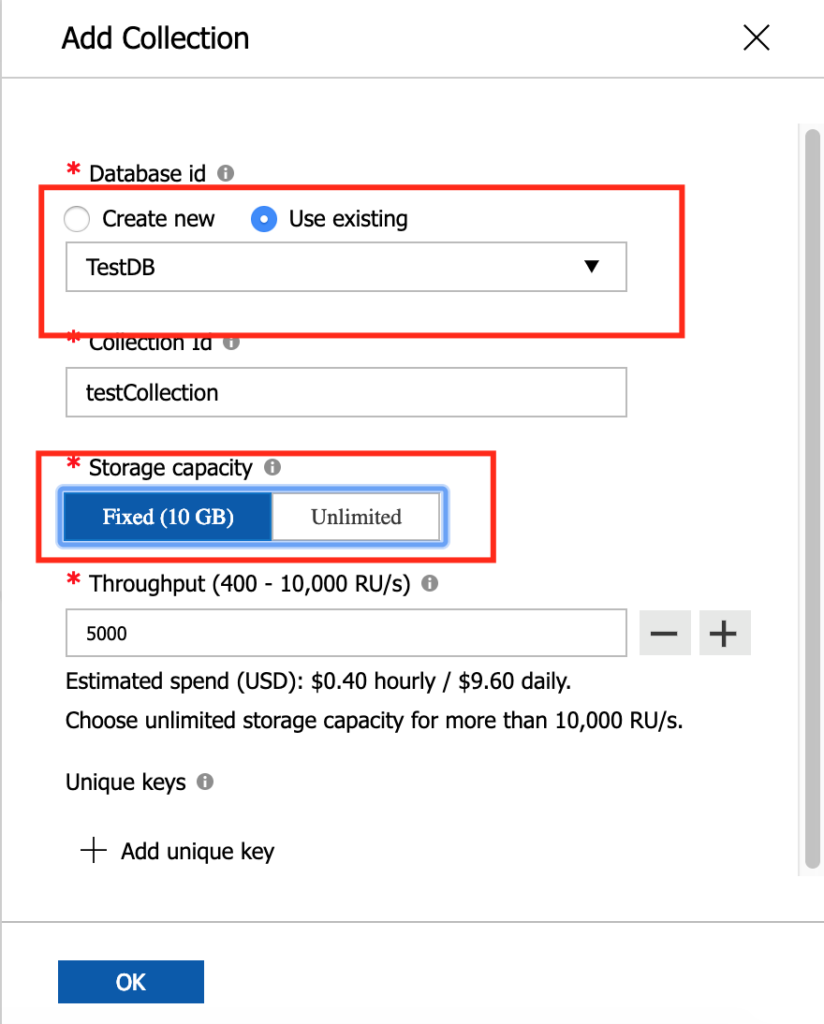
Figure 10 – Create collection
Select existing database and type a Collection Id. If you select “10 GB” as storage capacity, you do not need to create “Shard Key” or “Partition Key”. Otherwise, you need to create a partition key which helps logical grouping of documents.
I am not going to use the above created database and would go with a clean database name and collection name passed through Mule Connector.
Now open MuleSoft Anypoint Studio and let us get our hands dirty with a sample application. I am using version 7.3.2 that supports Mule Runtime 4.1.5.
Create a Mule project and add a HTTP Listener to the flow and configure HTTP Host and Port properties. In my case, my host is default and port 8087. You can set port with any unused ports in your computer. Add a MongoDB Module to the project by clicking “Search in Exchange” in the Mule Palette. In Mule 4, you specifically need to add a module to the project and each module supports operations-based connectors unlike previous versions.
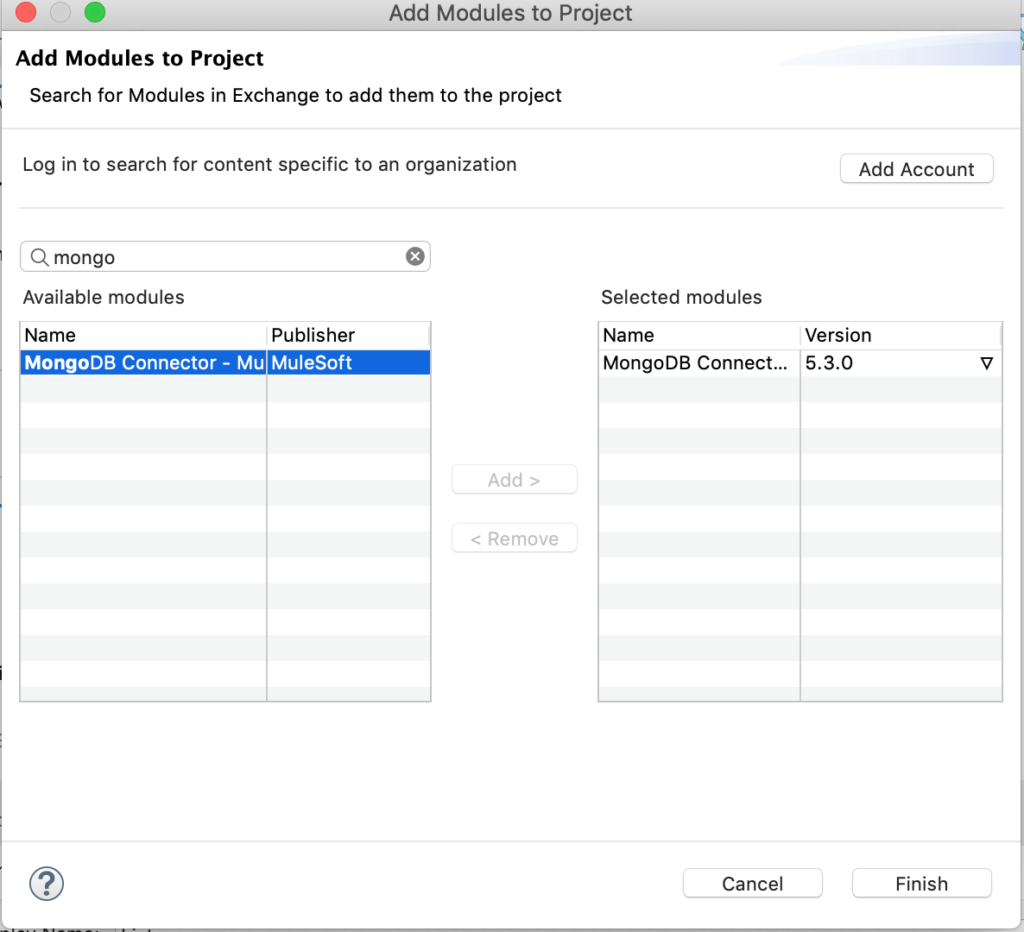
Figure 11 – MongoDB Connector Module
Once module is added, drag the connector “Insert document” into the flow created above and add a logger after that. Your flow should look like below:
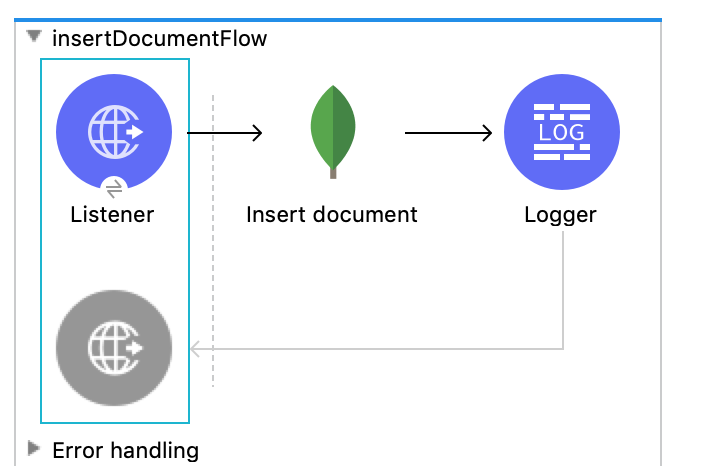
Figure 12 – Insert Document Flow
Now Click on “Insert document” connector and add the connector configuration by clicking “+” icon across the “Connector configuration:” dropdown.
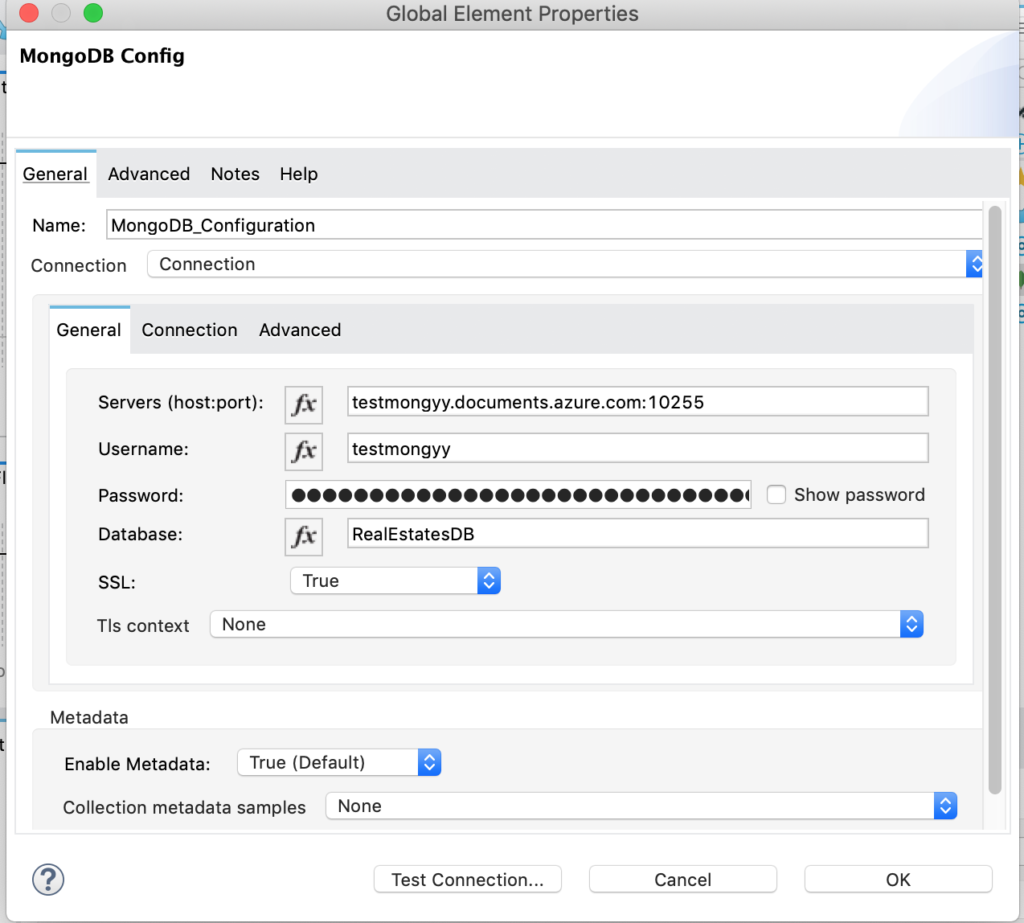
Figure 13 – MongoDB Configuration
In the General section, enter the hostname that you have noted down from Azure Portal and put “:” and add port number.
In my case, the host name is “testmongyy.documents.azure.com” and port is “10255” which is a standard MongoDB port. Then enter the username and password noted down from the “Connection String” section in the Azure portal (Refer Figure 7 above).
Now I want to name my Database as “RealEstateDB” and do not forget to set SSL to True so as to connect to Cosmos DB’s API for MongoDB. Now add the Collection name as “RealEstates” and keep the document default value as payload.
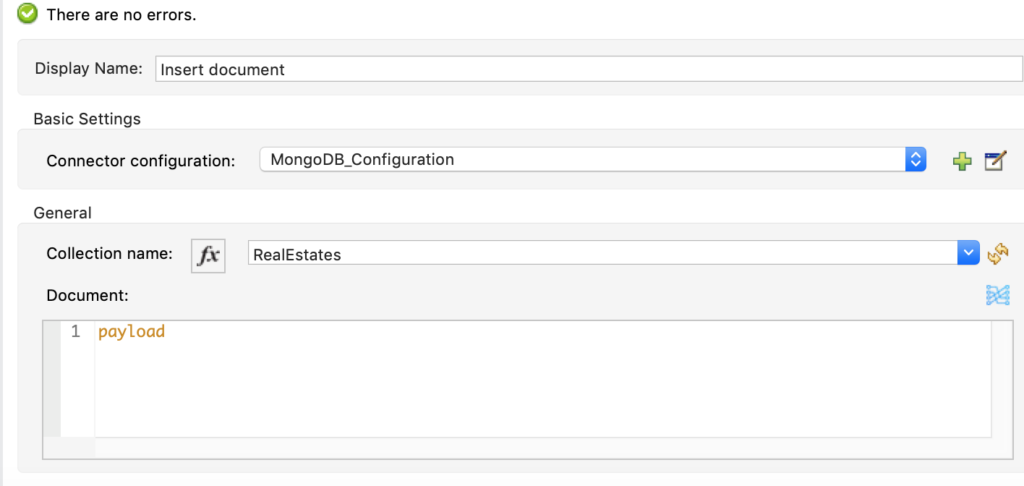
Figure 14 – Insert document properties
Now let us run our project and insert a document using Postman.
Sample JSON payload:
{
	"_id":"doc-6768868",
	"name":"Peter",
	"age":"42",
	"property_location":{
		"city":"NYC",
		"State":"NY"
	},
	"property_cost":"$500k"
}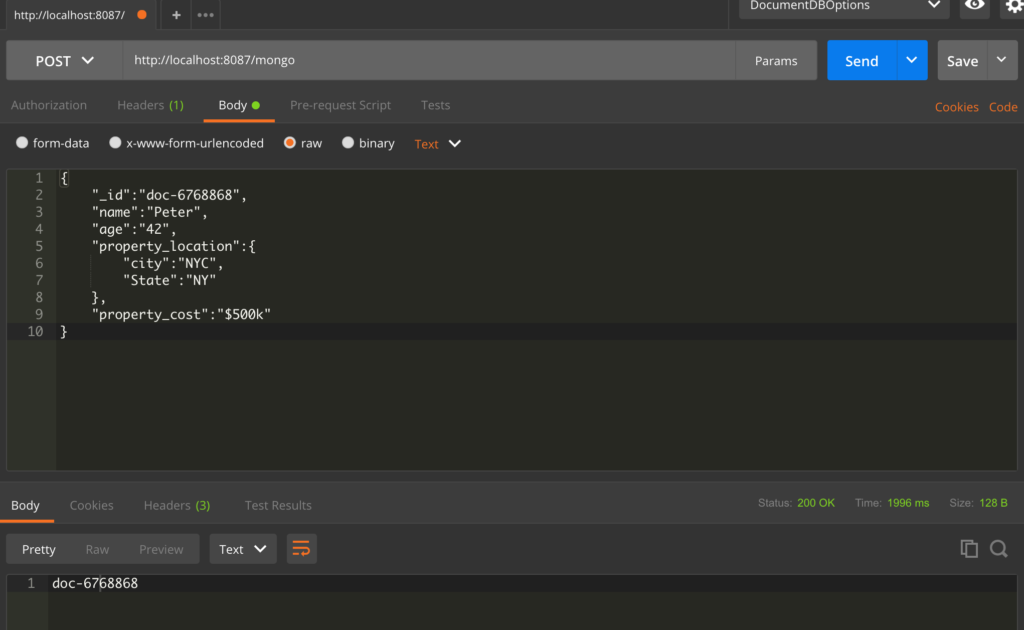
Figure 15 – Postman request and response
Once the post is successful, go to portal to check if the database, collection and document are created.
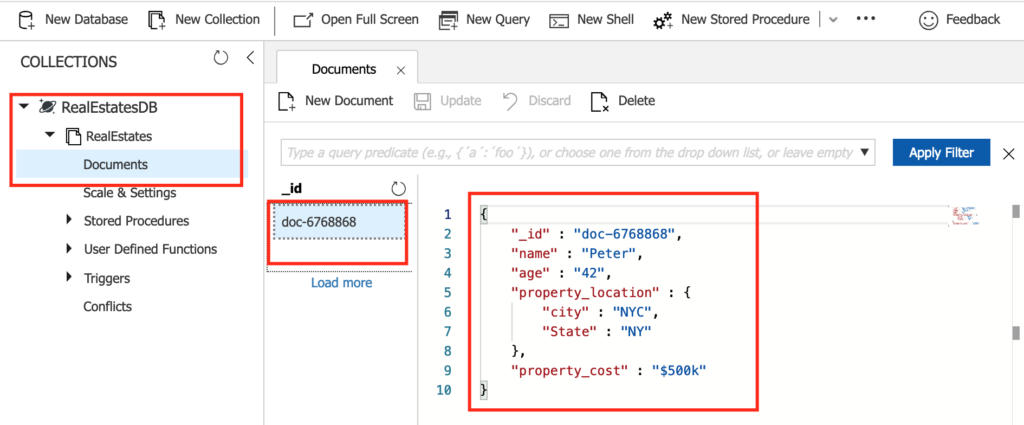
Figure 16 – Verify Data Explorer in Azure Portal
Insert some more data by changing the values. Make sure the value for property “_id” is unique. It is a unique key in the document. If you try to insert another document with same _id, you will see the following error:
“E11000 duplicate key error collection: RealEstatesDB.RealEstates Failed _id or unique key constraint”
I have inserted 3 more documents.
{
    "_id" : "doc-6768868",
    "name" : "Peter",
    "age" : "42",
    "property_location" : {
        "city" : "NYC",
        "State" : "NY"
    },
    "property_cost" : "$500k"
}

{
    "_id" : "doc-6769968",
    "name" : "John",
    "age" : "42",
    "property_location" : {
        "city" : "NYC",
        "State" : "NY"
    },
    "property_cost" : "$500k"
}

{
    "_id" : "doc-6766968",
    "name" : "Mary",
    "age" : "56",
    "property_location" : {
        "city" : "NYC",
        "State" : "NY"
    },
    "property_cost" : "$500k"
}
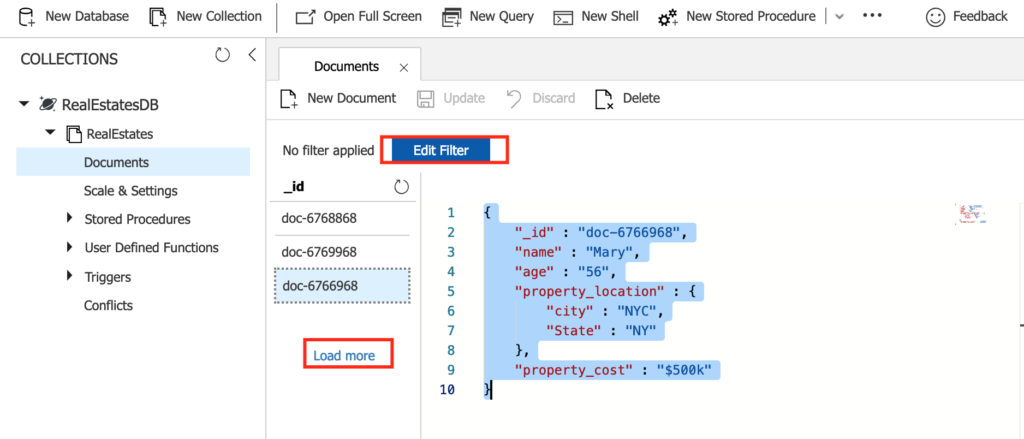
Figure 17 – Documents in the Data Explorer
Imagine you have 1000s of documents and you want to query for a particular criterion of documents, you can click “Edit Filter” button and add your criteria and click “Apply Filter”.
For example, if you want to search for “name” with “Peter”, you would type as below:

Figure 18 – Search for Peter
It would return one document. Change the criteria to {“age”:”42”} it should return two documents now.
Note that the filter uses MongoDB syntax.
Now let us go back to Anypoint Studio and play with two more connectors:
- List Collections
- Find Documents
Create another flow with HTTP Listener and drag the “List Collections” connector from the “Mule Palette”.
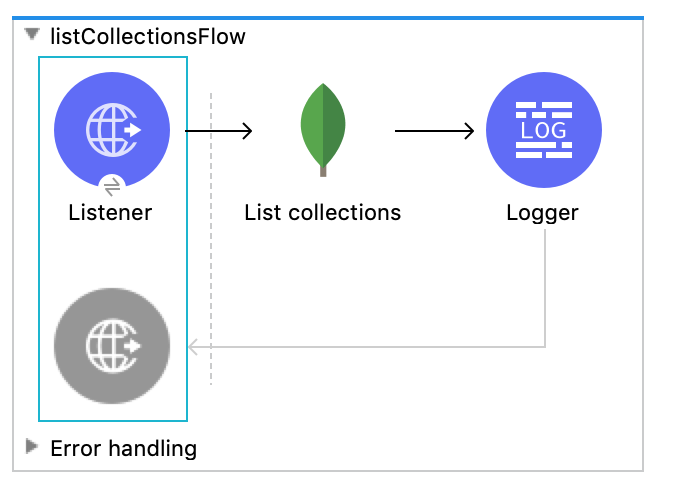
Figure 19 – List collections
HTTP Listener and List Collections connector uses configurations created in the previous flow. For this flow, set the path of the HTTP listener to “/list”.
Now let us open Postman and hit the second flow endpoint “http://localhost:8087/list“.
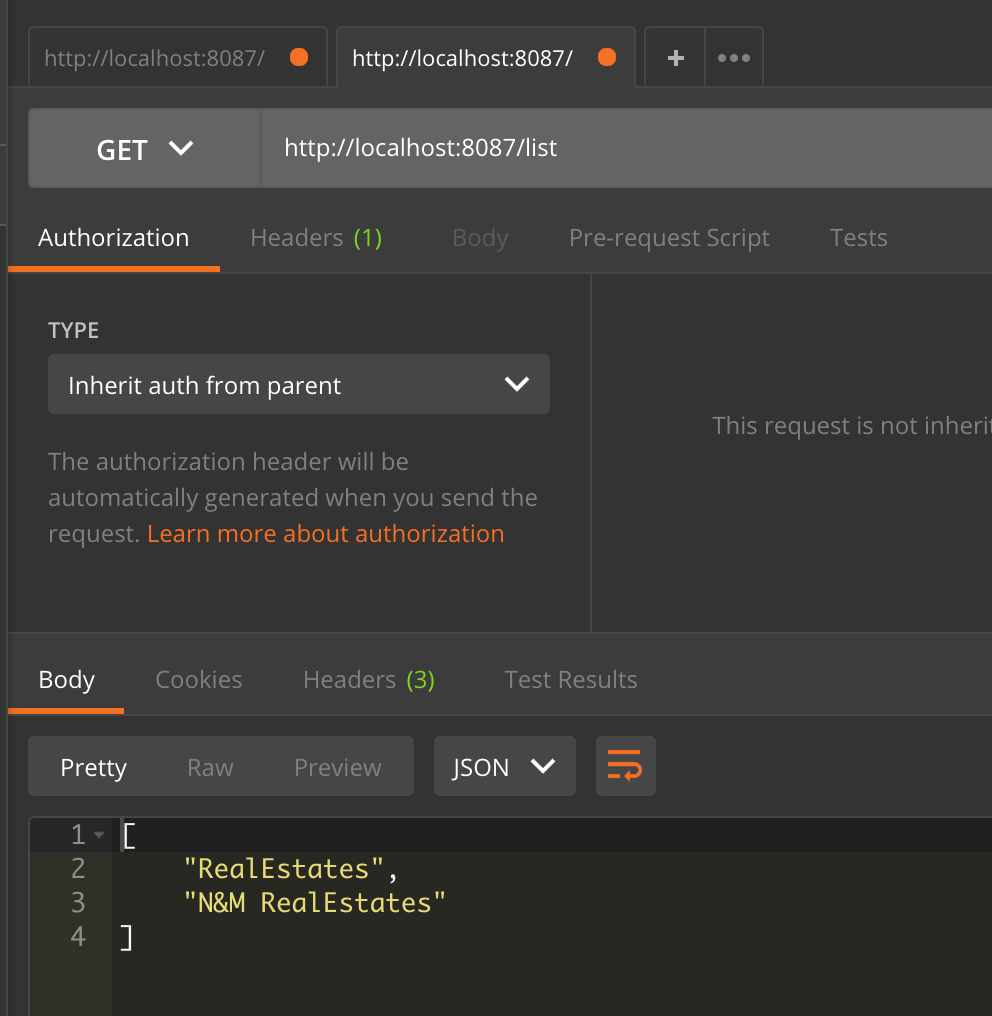
Figure 20 – Request for listing collections in the database
I have created two collections in the same database and so the response will have array of collection names.
Now let us create one more flow that takes the search criteria from Postman and returns the documents.
Create another flow with HTTP Listener and add “Find documents” connector to the flow which accepts the payload posted in the request. Set the path of the HTTP Listener to “/listfiles”.
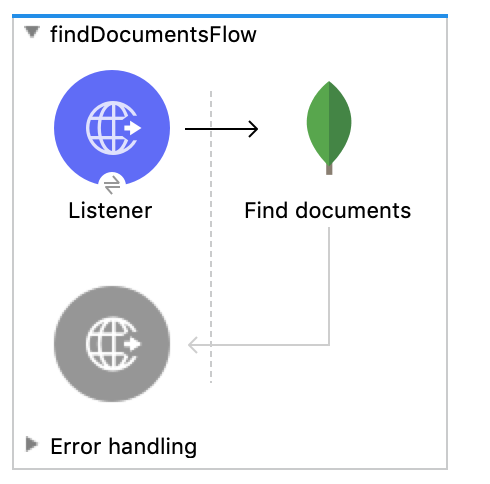
Figure 21 – Find documents
Now make a post request http://localhost:8087/listfileswith body selected as JSON as below:
{“age”:”42″}
You should see two documents listed in the response as per sample documents created.
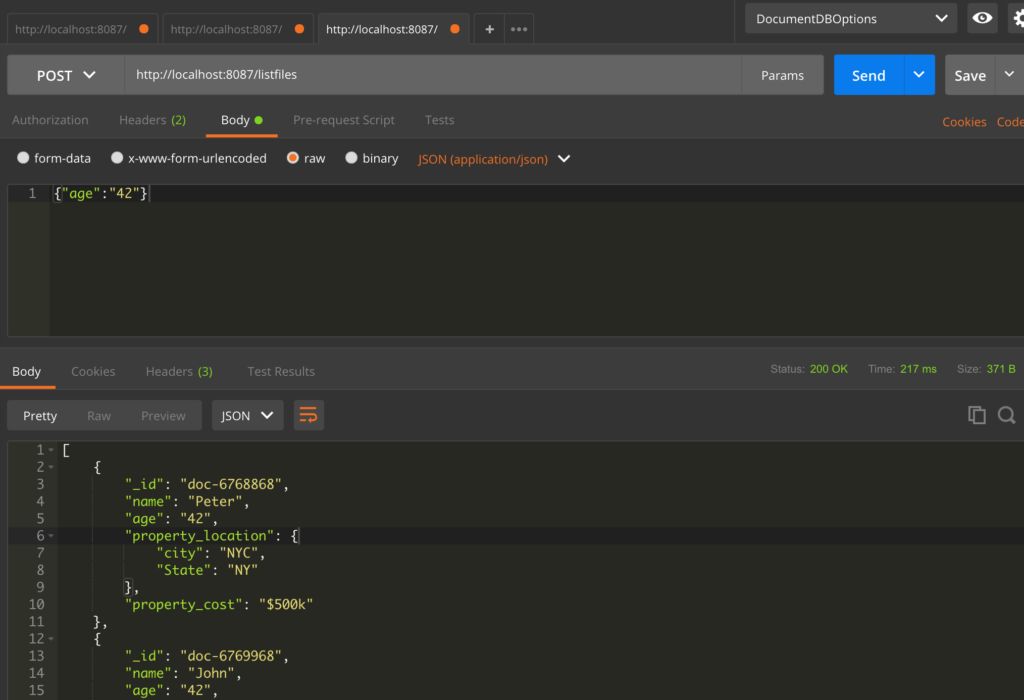
Figure 22 – list documents
Please note that I am passing “_id” with value. But if you do not pass the value in the post request, the “_id” property will be appended to document and it follows MongoDB format i.e. generates ObjectId before sending the insert operation to MongoDB. You can find more from MongoDB website https://docs.mongodb.com/manual/core/document/
About _id field and value generation.
I have posted the following request payload to insert document http://localhost:8087/mongo
{
	"name":"Mary",
	"age":"56",
	"property_location":{
		"city":"NYC",
		"State":"NY"
	},
	"property_cost":"$500k"
}
And the Data explorer in Azure portal shows the document text as below:
{
    "_id" : ObjectId("5c8d9654c188e717f1d76cf0"),
    "name" : "Mary",
    "age" : "56",
    "property_location" : {
        "city" : "NYC",
        "State" : "NY"
    },
    "property_cost" : "$500k"
}
This is a simple example with 3 operations-based connectors from MongoDB module. In real-time scenarios the development will be more complex, and more planning would be required before starting the development.
Sample code used in the exercise is available in GitHub: https://github.com/ivaturia/mongodbapi
Hope you had fun learning Azure Cosmos DB’s API for MongoDB.

